Quantcast
Channel: Forward Everyday
Viewing all 90 articles
Browse latest View live

JPA Data Auditing

$
0
0

Auditing

Sometime we need to keep track with the change of the Entity, eg.
  • When it is created
  • Who created it
  • Last modified date
  • Last modified by somebody

Implement via JPA

JPA specification provides a complete lifecycle of an Entity, which is easy to archive those purposes.
An example(dummy codes).
@Entity
public class Conference{

private User createdBy;
private Date createdDate;
private user lastModifiedBy;
private Date lastModifiedDate;


@PrePersist
public void prePersist(){
setCreatedBy(currentUser);
setCreatedDate(new Date());
}

@PreUpdate
public void preUpdate(){
setLastModifiedBy(currentUser);
setLastModifiedDate(new Date());
}

}
In this example, the method prePersist annotated with @PrePresistindicates it will be executed before em.persist(em is stand for jpa EntityManager) is executed.
And @PreUpdate will be executed before em.merge is executed.
JPA also provides a EntityListener feature. Using EntityListener, the lifecycle hook methods can be placed in a centered class.
Here we created two base entity classes, PersistableEntity identifies the entity can be persisted, it includes a id and version property. AndAuditableEntity extends PersistableEntity, adds some addtional properties.
@MappedSuperclass
public class PersistableEntity implements Serializable{
@Id
@GeneratedValue(strategy = GenerationType.AUTO)
@Column(name = "id")
private Long id;

@Version
private Long version;
}
@MappedSuperclass
@EntityListeners(value = { AuditEntityListener.class })
public class AuditableEntity extends PersistableEntity{

@ManyToOne
@JoinColumn(name = "created_by")
private User createdBy;

@Temporal(TemporalType.TIMESTAMP)
@Column(name = "created_date")
private Date createdDate;

@ManyToOne
@JoinColumn(name = "last_modified_by")
private User lastModifiedBy;

@Temporal(TemporalType.TIMESTAMP)
@Column(name = "last_modified_date")
private Date lastModifiedDate;
}
AuditableEntity is the base Entity class which defines the all auditing properties. It will apply an EntityListener AuditEntityListener class at runtime.
public class AuditEntityListener {
private static final Logger log = LoggerFactory
.getLogger(AuditEntityListener.class);

@PrePersist
public void prePersist(AuditableEntity e) {

e.setCreatedBy(SecurityUtil.getCurrentUser());
e.setCreatedDate(new DateTime());

}

@PreUpdate
public void preUpdate(AuditableEntity e) {
e.setLastModifiedBy(SecurityUtil.getCurrentUser());
e.setLastModifiedDate(new DateTime());
}
}
The @PrePersist and @PreUpdate methods can accept an object which will be passed into the related method of EntityManager.
Any classes extends AuditableEntity will be listened byAuditEntityListener.
@Entity
public class Signup extends AuditableEntity {
}
Obviously, the second solution is more flexible and maintainable.

Auditing from Spring Data JPA

Spring Data Commons defines some classes for auditing, currently only the Spring Data JPA module provides complete implementation.

Utilize the Spring Data facility

Spring Data provides two basic interfaces.
  • Persistable indicates the class is a persistable class, anyPersistable class could be indentified by a id property.
  • Auditable is an interface defines all required properties for auditing an Entity, it is inherited from Presistable interface.
Spring Data JPA provides two abstract classes to implement these interfaces.
  • AbstractPersistable implements Persisteable, annotates idproperty with @Id to indicate it is a JPA primary key.
  • AbstractAuditable implements Auditable, and the auditor type is a acceptable type argument passed into AbstractAuditable.
An example to demonstrate these.
@Entity
public class Conference extends AbstractAuditable<User, Long>{

}
Spring Data JPA provides a generic EntityListener to track theAuditable interfaces.
You must configure it in the orm.xml(/src/main/resouces).
<?xml version="1.0" encoding="UTF-8"?>
<entity-mappings
xmlns="http://java.sun.com/xml/ns/persistence/orm"
xmlns:xsi="http://www.w3.org/2001/XMLSchema-instance"
xsi:schemaLocation="http://java.sun.com/xml/ns/persistence/orm http://java.sun.com/xml/ns/persistence/orm_2_0.xsd" version="2.0">
<persistence-unit-metadata>
<persistence-unit-defaults>
<entity-listeners>
<entity-listener class="org.springframework.data.jpa.domain.support.AuditingEntityListener" />
</entity-listeners>
</persistence-unit-defaults>
</persistence-unit-metadata>
</entity-mappings>
You have to create a empty persistence.xml in the same folder, or theAuditingEntityListener does not work as expected, even you have declared a LocalContainerEntityManagerFactoryBean which does not force you to provide a persistence.xml configuration. Maybe this is an issue of Spring.
<?xml version="1.0" encoding="UTF-8"?>
<persistence version="2.0"
xmlns="http://java.sun.com/xml/ns/persistence"
xmlns:xsi="http://www.w3.org/2001/XMLSchema-instance"
xsi:schemaLocation="http://java.sun.com/xml/ns/persistence http://java.sun.com/xml/ns/persistence/persistence_2_0.xsd">
<persistence-unit name="persistenceUnit" transaction-type="RESOURCE_LOCAL"/>
</persistence>
Next, you must create an AuditorWare implementation bean which implements how to fetch auditor, generally it is the current user in the real world application. Spring will inject the auditor into AuditingEntityListener at runtime.
@Named(value="auditorBean")
public class AuditorBean implements AuditorAware<User> {
private static final Logger LOGGER=LoggerFactory.getLogger(AuditorBean.class);

private User currentAuditor;

@Override
public User getCurrentAuditor() {
// Authentication authentication = SecurityContextHolder.getContext().getAuthentication();
//
// if (authentication == null || !authentication.isAuthenticated()) {
// return null;
// }
//
// return ((MyUserDetails) authentication.getPrincipal()).getUser();
LOGGER.debug("call AuditorAware.getCurrentAuditor(");
return currentAuditor;
}

public void setCurrentAuditor(User currentAuditor) {
this.currentAuditor = currentAuditor;
}

}
In the real world application, the current authenticated user can be fetched from SecurtiyContextHolder.
Declare a <jpa:auditing/> in Spring configuration to enable auditing feature in the project.
<jpa:auditing auditor-aware-ref="auditorBean"/>
Now write some codes to test the auditing.
@Test
@Transactional
public void retrieveConference() {
Conference conference = newConference();
conference.setSlug("test-jud");
conference.setName("Test JUD");
conference.getAddress().setCountry("US");
conference = conferenceRepository.save(conference);
em.flush();

assertTrue(null != conference.getId());
conference = conferenceRepository.findBySlug("test-jud");

log.debug("conference @" + conference);
assertTrue(null != conference);

assertTrue(conference.getCreatedBy() != null);
assertTrue("hantsy".equals(conference.getCreatedBy().getUsername()));
assertTrue(conference.getCreatedDate() != null);
assertTrue(conference.getLastModifiedBy() != null);

assertTrue("hantsy"
.equals(conference.getLastModifiedBy().getUsername()));
assertTrue(conference.getLastModifiedDate() != null);

assertTrue(conference.getCreatedDate().equals(
conference.getLastModifiedDate()));

conference
.setDescription("change desc, the modified date should be updated.");
conferenceRepository.save(conference);
em.flush();

conference = conferenceRepository.findBySlug("test-jud");
log.debug("created date @" + conference.getCreatedDate());
log.debug("modified date @" + conference.getLastModifiedDate());
assertTrue(!conference.getCreatedDate().equals(
conference.getLastModifiedDate()));
}

Add auditing to existing classes

If you have some existing entities, and do not modify them to extendAbstractAuditable, you can add some annotations to existing classes to implement the auditing feature.
@Entity
public class Signup {

@Id
@GeneratedValue(strategy = GenerationType.AUTO)
@Column(name = "id")
private Long id;

@DateTimeFormat(style = "M-")
@CreatedDate
private Date createdDate;

@LastModifiedDate
@DateTimeFormat(style = "M-")
private Date modifiedDate;

@CreatedBy()
@ManyToOne
private User createdBy;

@LastModifiedBy
@ManyToOne
private User modifiedBy;

}
The date fields can accept java.util.Date, joda DateTime orLong/long type.
Here some test codes.
@Test
@Transactional
public void testSignup() {
Conference conference = newConference();
conference.setSlug("test-jud");
conference.setName("Test JUD");
conference.getAddress().setCountry("US");
Signup signup = newSignup();
conference.addSignup(signup);
conference = conferenceRepository.save(conference);
em.flush();

assertTrue(null != conference.getId());
assertTrue(null != signup.getId());

Signup signup2=signupRepository.findById(signup.getId());

assertTrue(signup2.getCreatedBy() != null);
assertTrue("hantsy".equals(signup2.getCreatedBy().getUsername()));
assertTrue(signup2.getCreatedDate() != null);
assertTrue(signup2.getModifiedBy() != null);

assertTrue("hantsy"
.equals(signup2.getModifiedBy().getUsername()));
assertTrue(signup2.getModifiedDate() != null);

assertTrue(signup2.getCreatedDate().equals(
signup2.getModifiedDate()));

signup2.setComment("add comment to signup, and the signup is changed, the modified date should be updated.");
signupRepository.save(signup2);
em.flush();

signup2=signupRepository.findById(signup.getId());
log.debug("created date @" + signup2.getCreatedDate());
log.debug("modified date @" + signup2.getModifiedDate());
assertTrue(!signup2.getCreatedDate().equals(
signup2.getModifiedDate()));
}

Summary

The Auditing feature from Spring Data JPA is very simple and stupid, and it is useful in the real world application.

Create a restul application with AngularJS and CakePHP(I) :Prepare project skeleton

$
0
0

Prepare project skeleton

There are several solutions provided in the CakePHP documents to create a new CakePHP project from scratch.
  • clone the cakephp from github, and work on it.
  • use bake command line from the shared Cake distribution to create a new project.
In the advanced section, the official guide also motioned how to create a CakePHP project via bake console and manage project dependencies via Composer.
Let's create a CakePHP project step by step.

Bake project skeleton

  1. Create a folder for the new project, eg. angularjs-cakephp-sample.
  2. In the angularjs-cakephp-sample root, create a folder namedVendor.
  3. Get a copy of composer.phar from Composer, put it in the root folder of angularjs-cakephp-sample.
  4. Create a text file named composer.json, the content is the following.
 {
"name": "example-app",
"repositories": [
{
"type": "pear",
"url": "http://pear.cakephp.org"
}
],
"require": {
"pear-cakephp/cakephp": ">=2.4.0",
"cakephp/debug_kit": "2.2.*",
"cakephp/localized": "2.1.x-dev"
},
"config": {
"vendor-dir": "Vendor/"
}
}
Put it into the root folder of angularjs-cakephp-sample.
Now the root folder structure looks like the following.
 angularjs-cakephp-sample
/Vendor
composer.json
composer.phar
  1. Run php composer.phar install in the project root folder. After it is done, you will get a copy of the latest CakePHP, and it is extracted into the Vendor folder. Now the folder should look like.
 angularjs-cakephp-sample
/Vendor
/pear-pear.cakephp.org
/CakePHP
composer.json
composer.phar
  1. Create the new project skeleton using bake command line in the CakePHP dependency(under Vendor).
 Vendor\pear-pear.cakephp.org\CakePHP\bin\cake.bat bake project --app <path of angularjs-cakephp-sample>
You maybe notice there is a copy of cake under Vendor\bin, but unfortunately it does not work in the current stable version(2.4.2) as described in the document.
Due to this issue, under windows, I have to use the above command line to create the project. And this issue will be fixed in the further 2.4.3.

Configure Apache for this application

I assume you have installed a PHP runtime environment for this project. PHP is ready for all popular Linux distributions. I am usingWAMP 2.4 under windows.

Enable mod_rewrite

mod_rewrite is required for CakePHP application. You have to enable it in the Apache configuration file.
Find the following line in the <apache>/conf/httpd.conf file.
LoadModule rewrite_module modules/mod_rewrite.so
Make sure it is not commented.
WAMP provides a context menu to configure the modules in Apache. You can click the mod_rewrite menu item to enable or disable.
After the configuration is saved, do not forget to restart the Apache server.

Configure DocumentRoot

In order to run the project on Apache, you need extra configuration.
The simplest way is set the DocumentRoot to the project path.
DocumentRoot "<project path>"
Alternatively, you can use a standalone host settings.
Create a angularjs-cakephp-sample.conf in the <WAMP>/hosts.
<VirtualHost *:80>
ServerName localhost
DocumentRoot E:/MyWorks/hantsy-labs/angularjs-cakephp-sample/webroot

<Directory E:/MyWorks/hantsy-labs/angularjs-cakephp-sample/webroot>
DirectoryIndex index.php
Options Indexes FollowSymLinks MultiViews
AllowOverride All
Order allow,deny
Allow from all
</Directory>
</VirtualHost>
Now you can access the project via http://localhost.
If you want to use a context path for this project, you can use aliasconfiguration or enable user_dir module support in Apache configuration.
Thus you can access the project via url http://localhost/angularjs-cakephp-sample, or http://localhost/~<yourname>/angularjs-cakephp-sample, but you have to change the default configuration in the.htaccess under project root and webroot, add a RewriteBase line, the value is the context path of the project.
<IfModule mod_rewrite.c>
RewriteEngine on
RewriteBase /angularjs-cakephp-sample
RewriteRule ^$ webroot/ [L]
RewriteRule (.*) webroot/$1 [L]
</IfModule>

Modify the source codes

In order to run the project, you should modify the generated sources slightly.

Workaround of the Classloader

In the CakePHP document, there are some content to describe how to modify the CakePHP classloader and make it compatible withComposer generated classloader.
Open Config/bootstrap.php file, append the following content.
// Load composer autoload.
require APP . '/Vendor/autoload.php';

// Remove and re-prepend CakePHP's autoloader as composer thinks it is the most important.
// See https://github.com/composer/composer/commit/c80cb76b9b5082ecc3e5b53b1050f76bb27b127b
spl_autoload_unregister(array('App', 'load'));
spl_autoload_register(array('App', 'load'), true, true);

Define CAKE_CORE_INCLUDE_PATH

In the webroot/index.php, find the CAKE_CORE_INCLUDE_PATH constant definition, and replace it with the following content.
define(
'CAKE_CORE_INCLUDE_PATH',
ROOT . DS . APP_DIR . '/Vendor/pear-pear.cakephp.org/CakePHP'
);

Run the project

Start up Apache server, and navigate to http://localhost.
You would see the following screen.
localhost
If all configuration are correctly, you could see all the configuration items are displayed as green bars. If there are some error or warning, please go back to the project source codes and fix them firstly.

Summary

The bake command line will generate the session salt and security key, database configuration for you automatically. And Composerprovides dependencies for the project. Compare to the PEARpackage management, the benefit is obviously. Using Composer you can use a project scoped CakePHP, thus you can use different versions of CakePHP in different projects, and the more powerful feature of Composer is you can upgrade your CakePHP to the new version easily.

Create a restful application with AngularJS and CakePHP(II): Bake backend REST API

$
0
0

Bake backend REST API

I will reuse the database scheme of the CakePHP Blog tutorial.

Prepare posts table

Execute the following scripts to create a posts table in your MySQL database, it also initialized the sample data.
/* First, create our posts table: */
CREATE TABLE posts (
id INT UNSIGNED AUTO_INCREMENT PRIMARY KEY,
title VARCHAR(50),
body TEXT,
created DATETIME DEFAULT NULL,
modified DATETIME DEFAULT NULL
);

/* Then insert some posts for testing: */
INSERT INTO posts (title,body,created)
VALUES (’The title’, ’This is the post body.’, NOW());
INSERT INTO posts (title,body,created)
VALUES (’A title once again’, ’And the post body follows.’, NOW());
INSERT INTO posts (title,body,created)
VALUES (’Title strikes back’, ’This is really exciting! Not.’, NOW());
You can use MySQL client command line or MySQL Workbench(GUI) to complete this work.

Bake the skeleton of model and controller

Use bake command line to generate model, controller for posts table.
 Vendor\pear-pear.cakephp.org\CakePHP\bin\cake.bat bake model Post
This command will generate a Model named Post, it is under Modelfolder.
class Post extends AppModel {

}
A model class must extend AppModel which is a base class in the same folder, it is a place holder to customize common model hooks for all models in your application.
Use the following command to generate the posts controller.
 Vendor\pear-pear.cakephp.org\CakePHP\bin\cake.bat bake controller posts
After it is executed and a file named PostsController.php will be generated in the Controller folder.
class PostsController extends AppController {
public $scaffold;
}
A controller class must extends AppController, it is similar with theAppModel. It is a place holder to customize the common controller lifecycle. All controllers in this application should extendAppController
The naming of table, model and controller follows the CakePHP naming convention.
You can also use cake bake all to generate model, controller and view together. Of course, I do not need the view in this project, as described formerly, we will use AngularJS to build the frontend UI.
If you want to generate the codes interactively, ignore the name argument in the bake command line.
For example,
 Vendor\pear-pear.cakephp.org\CakePHP\bin\cake.bat bake controller 
The bake command will guide you to generate the PostsControllerstep by step, you can also generate the CRUD dummy codes instead of the default public $scaffold;.
But the generated CRUD methods are ready for web pages, we will replace them with REST resource operations.

Make the controller restful

Open PostsController and add the basic CRUD methods for modelPost.
public function index() {
$posts = $this->Post->find('all');
$this->set(array(
'posts' => $posts,
'_serialize' => array('posts')
));
}

public function view($id) {
$post = $this->Post->findById($id);
$this->set(array(
'post' => $post,
'_serialize' => array('post')
));
}

public function add() {
//$this->Post->id = $id;
if ($this->Post->save($this->request->data)) {
$message = array(
'text' => __('Saved'),
'type' => 'success'
);
} else {
$message = array(
'text' => __('Error'),
'type' => 'error'
);
}
$this->set(array(
'message' => $message,
'_serialize' => array('message')
));
}

public function edit($id) {
$this->Post->id = $id;
if ($this->Post->save($this->request->data)) {
$message = array(
'text' => __('Saved'),
'type' => 'success'
);
} else {
$message = array(
'text' => __('Error'),
'type' => 'error'
);
}
$this->set(array(
'message' => $message,
'_serialize' => array('message')
));
}

public function delete($id) {
if ($this->Post->delete($id)) {
$message = array(
'text' => __('Deleted'),
'type' => 'success'
);
} else {
$message = array(
'text' => __('Error'),
'type' => 'error'
);
}
$this->set(array(
'message' => $message,
'_serialize' => array('message')
));
}
As you see, we must use _serialize as the key of the associated array of the returned result.
Besides these, RequestHandler component is required to process the REST resource request.
public $components = array('RequestHandler');
Open Config/routes.php, add the following lines beforerequire CAKE . 'Config' . DS . 'routes.php';.
Router::mapResources("posts");
Router::parseExtensions();
Router::mapResources indicates which posts will be mapped as REST resources, and Router::parseExtensions will parse the resources according to the file extension, XML and JSON are native supported.
Now navigate to http://localhost/posts.json, you will get the following JSON string in browser.
{
"posts": [
{
"Post": {
"id": "1",
"title": "The title",
"body": "This is the post body.",
"created": "2013-10-22 16:10:53",
"modified": null
}
},
{
"Post": {
"id": "2",
"title": "A title once again",
"body": "And the post body follows.",
"created": "2013-10-22 16:10:53",
"modified": null
}
},
{
"Post": {
"id": "3",
"title": "Title strikes back",
"body": "This is really exciting! Not.",
"created": "2013-10-22 16:10:53",
"modified": null
}
}
]
}
When access http://localhost/posts.json, it will call the index method of PostsController, and render the data as JOSN format. CakePHP follows the following rules to map REST resources to controllers. Here I use PostsController as an example to describe it.
URLHTTP MethodPostsController methodDescription
/posts.jsonGETindexGet the list of Posts
/posts.jsonPOSTaddCreate a new Post
/posts/:id.jsonGETviewGet the details of a Post
/posts/:id.jsonPUTeditUpdate a Post by id
/posts/:id.jsonDELETEdeleteDelete a Post by id
If you want to change the resource mapping, you can define your rules via Router::resourceMap in Config/routes.php.
Router::resourceMap(array(
array(’action’ => ’index’, ’method’ => ’GET’, ’id’ => false),
array(’action’ => ’view’, ’method’ => ’GET’, ’id’ => true),
array(’action’ => ’add’, ’method’ => ’POST’, ’id’ => false),
array(’action’ => ’edit’, ’method’ => ’PUT’, ’id’ => true),
array(’action’ => ’delete’, ’method’ => ’DELETE’, ’id’ => true),
array(’action’ => ’update’, ’method’ => ’POST’, ’id’ => true)
));
Alternatively, you can use Router::connect to define the route rule manually.

Summary

CakePHP REST API producing is simple and stupid, the only thing make me a little incompatible is the produced JSON data, the JSON data structure is a little tedious.

Create a restful application with AnguarJS and CakePHP(III): Build the frontend pages with AngularJS

$
0
0

Build the frontend pages with AngularJS

AngularJS is one of the most popular JS frameworks, with which it is easy to build awesome single page applications.
If you have no experience of AngularJS framework before, you could have to read the official AngularJS tutorial firstly and get the basic concept of AngularJS.

Prepare AngularJS resources

In this project, I do not want to make thing complex, so the AngularJS resources will be put in the same application. In further posts, I could move the AngularJS frontend resource into a standalone NodeJS application.
You can download a copy of AngularJS seed from AngularJS Github, extract files into your local disc, and copy the app folder into webrootfolder of this project as the start point of the next steps.
The app folder should look like.
webroot
/app
/js
app.js
controllers.js
directives.js
filters.js
services.js

/img
/css
/lib
/angular
/bootstrap
jquery.js
/partials
index.html
I place jquery, angular and bootstrap into the lib folder.

index.html

index.html is the template container of all pages.
<!doctype html>
<html lang="en" ng-app="myApp">
<head>
<meta charset="utf-8">
<title>AngularJS CakePHP Sample APP</title>
<link href="lib/bootstrap/css/bootstrap.min.css" rel="stylesheet" media="screen">
<link rel="stylesheet" href="css/app.css"/>
</head>
<body ng-controller="AppCtrl">
<div class="navbar navbar-fixed">
<div class="navbar-inner">
<a class="brand" href="#">
<msg key="title"></msg>
</a>
<ul class="nav">
<li ng-class="activeWhen(path() == '/posts')">
<a href="#/posts">Posts</a>
</li>
<li ng-class="activeWhen(path() == '/new-post')">
<a href="#/new-post">New Post</a>
</li>
</ul>
</div>
</div>

<div class="container">
<div ng-class="'alert alert-' + message().type" ng-show="message().show">
<button type="button" class="close" ng-click="message().show = false">×</button>
<msg key-expr="message().text"></msg>
</div>
<ng-view></ng-view>
<div class="footer">Angular seed app: v<span app-version></span></div>
</div>


<!-- In production use:
<script src="//ajax.googleapis.com/ajax/libs/angularjs/1.0.7/angular.min.js"></script>
-->
<script type="text/javascript" src="lib/jquery.js"></script>
<script type="text/javascript" src="lib/jquery.i18n.properties-min-1.0.9.js"></script>
<script type="text/javascript" src="lib/html5shiv.js"></script>
<script type="text/javascript" src="lib/holder.js"></script>
<script type="text/javascript" src="lib/bootstrap/js/bootstrap.min.js"></script>

<script type="text/javascript" src="lib/angular/angular.js"></script>
<script type="text/javascript" src="js/app.js"></script>
<script type="text/javascript" src="js/services.js"></script>
<script type="text/javascript" src="js/controllers.js"></script>
<script type="text/javascript" src="js/filters.js"></script>
<script type="text/javascript" src="js/directives.js"></script>

</body>
</html>

In the html element, there is a ng-app attribute, which indicates this is an AngularJs application. In the js/app.js file, define a AngularJS module named myAPP, it includes submodules myApp.filters,myApp.directive, myApp.controllers, they are deifned in filters.js, directives.js, controllers.js files respectively.
as = angular.module('myApp', ['myApp.filters', 'myApp.services', 'myApp.directives', 'myApp.controllers']);

The index.html will work as a template, there is a ng-view element, which is a AngularJS specific directive, it will render the routing page content at runtime.

Routing

In the js/app.js, define the path routing of Post list, add, edit page.
as.config(function($routeProvider, $httpProvider) {
$routeProvider
.when('/posts', {templateUrl: 'partials/posts.html', controller: 'PostListCtrl'})
.when('/new-post', {templateUrl: 'partials/new-post.html', controller: 'NewPostCtrl'})
.when('/edit-post/:id', {templateUrl: 'partials/edit-post.html', controller: 'EditPostCtrl'})
.otherwise({redirectTo: '/'});

});

Post List

Let's create the posts.html and PostListCtrl.
<div ng-controller="PostListCtrl">
<h1 class="page-header">Post List</h1>
<table class="table">
<thead>
<tr>
<th width="25px">ID</th>
<th>TITLE</th>
<th>CONTENT</th>
<th>CREATED DATE</th>
<th width="50px"></th>
</tr>
</thead>
<tbody>
<tr ng-repeat="e in posts">
<td>{{e.Post.id}}</td>
<td>{{e.Post.title}}</td>
<td>{{e.Post.body}}</td>
<td>{{e.Post.created|date:'short'}}</td>
<td><a ng-click="editPost($index)"><i
class="icon-pencil"></i>
</a>
 
<a ng-click="delPost($index)"><i
class="icon-remove-circle"></i></a></td>
</tr>
</tbody>
</table>


</div>
In the posts.html, use a ng-repeat directive to interate the posts in a table.
Define a PostListCtrl in js/controllers.js.
as.controller('PostListCtrl', function($scope, $rootScope, $http, $location) {
var load = function() {
console.log('call load()...');
$http.get($rootScope.appUrl + '/posts.json')
.success(function(data, status, headers, config) {
$scope.posts = data.posts;
angular.copy($scope.posts, $scope.copy);
});
}

load();

$scope.addPost = function() {
console.log('call addPost');
$location.path("/new-post");
}

$scope.editPost = function(index) {
console.log('call editPost');
$location.path('/edit-post/' + $scope.posts[index].Post.id);
}

$scope.delPost = function(index) {
console.log('call delPost');
var todel = $scope.posts[index];
$http
.delete($rootScope.appUrl + '/posts/' + todel.Post.id + '.json')
.success(function(data, status, headers, config) {
load();
}).error(function(data, status, headers, config) {
});
}

});
PostListCtrl will load the posts from REST API by default. In the scope of PostListCtrl, there are some other actions defined,addPost and editPost are use to navigate to a new add or edit page, and delPost will the selected Post immediately, and refresh the list after it is deleted successfully.
More info about scope and $http, please consult the online AngularJS document.
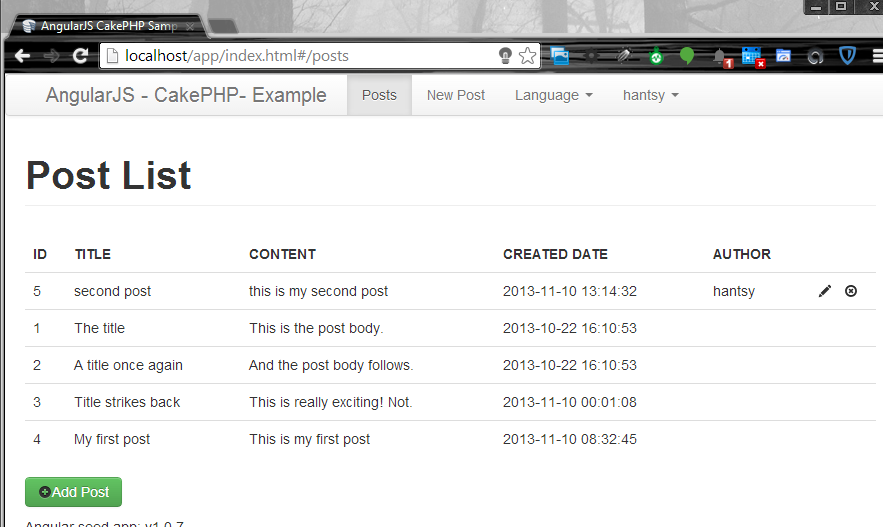
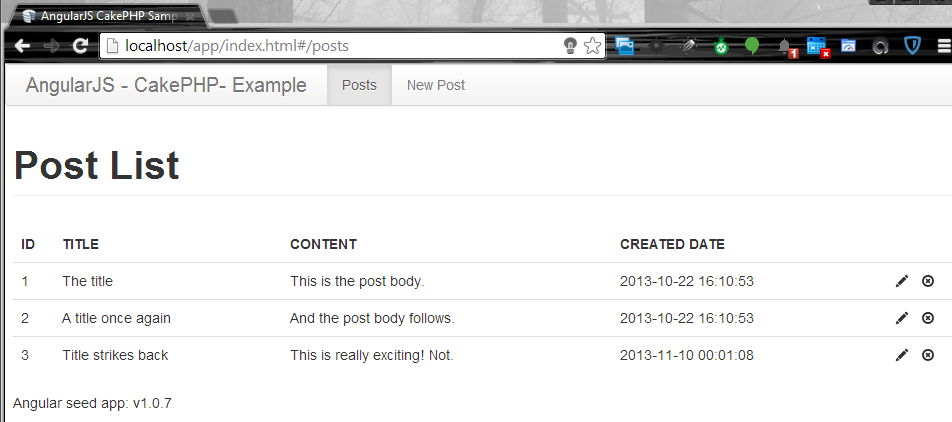
In browser, navigate to http://localhost/app/index.html and click Post List link, you should see the screen like this.
AngularJS app posts

Add a new Post

According to the routing definition, we need to create a new-post.html page and a controller NewPostCtrl.
The new-post.html template.
<div ng-controller="NewPostCtrl">
<form class="form-horizontal">
<h1 class="page-header">New Post</h1>
<fieldset>
<div class="control-group">
<label class="control-label" for="title">Title</label>
<div class="controls">
<input id="title" type="text" class="input-block-level"
required="true" ng-model="post.title"></input>
</div>
</div>
<div class="control-group">
<label class="control-label" for="body">Body</label>
<div class="controls">
<textarea id="body" class="input-block-level" rows="10"
ng-model="post.body" required="true"></textarea>
</div>
</div>
</fieldset>
<div class="form-actions">
<button class="btn btn-primary" ng-click="savePost()">Add Post</button>
</div>
</form>
</div>
The NewPostCtrl controller.
as.controller('NewPostCtrl', function($scope, $rootScope, $http, $location) {

$scope.post = {};

$scope.savePost = function() {
console.log('call savePost');
var _data = {};
_data.Post = $scope.post;
$http
.post($rootScope.appUrl + '/posts.json', _data)
.success(function(data, status, headers, config) {
$location.path('/posts');
}).error(function(data, status, headers, config) {
});
}
});
Add a button in the posts.html.
<p>
<button type="button" class="btn btn-success"
ng-click="addPost()">
<b class="icon-plus-sign"></b>Add Post
</button>
</p>
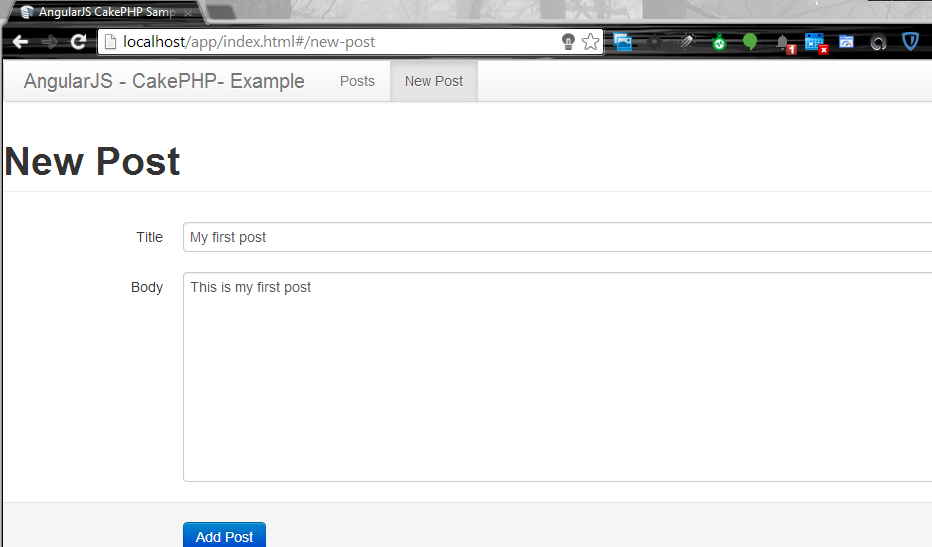
Refresh your brower have a try now.
AngularJS app posts

Edit Post

The template page and controller is similar with the add action, the difference is we must load the edit data from REST API before open the edit page.
The edit-post.html template.
<div ng-controller="EditPostCtrl">
<form class="form-horizontal">
<h1 class="page-header">Edit Post({{post.id}}, created at {{post.created|date:'short'}})</h1>
<fieldset>
<div class="control-group">
<label class="control-label" for="title">Title</label>
<div class="controls">
<input id="title" type="text" class="input-block-level"
required="true" ng-model="post.title"></input>
</div>
</div>
<div class="control-group">
<label class="control-label" for="body">Body</label>
<div class="controls">
<textarea id="body" class="input-block-level" rows="10"
ng-model="post.body" required="true"></textarea>
</div>
</div>
</fieldset>
<div class="form-actions">
<button ng-click="updatePost()" class="btn btn-primary">Update Post</button>
</div>
</form>
</div>
The EditPostCtrl controller.
as.controller('EditPostCtrl', function($scope, $rootScope, $http, $routeParams, $location) {

var load = function() {
console.log('call load()...');
$http.get($rootScope.appUrl + '/posts/' + $routeParams['id'] + '.json')
.success(function(data, status, headers, config) {
$scope.post = data.post.Post;
angular.copy($scope.post, $scope.copy);
});
}

load();

$scope.post = {};

$scope.updatePost = function() {
console.log('call updatePost');

var _data = {};
_data.Post = $scope.post;
$http
.put($rootScope.appUrl + '/posts/' + $scope.post.id + '.json', _data)
.success(function(data, status, headers, config) {
$location.path('/posts');
}).error(function(data, status, headers, config) {
});
}
});
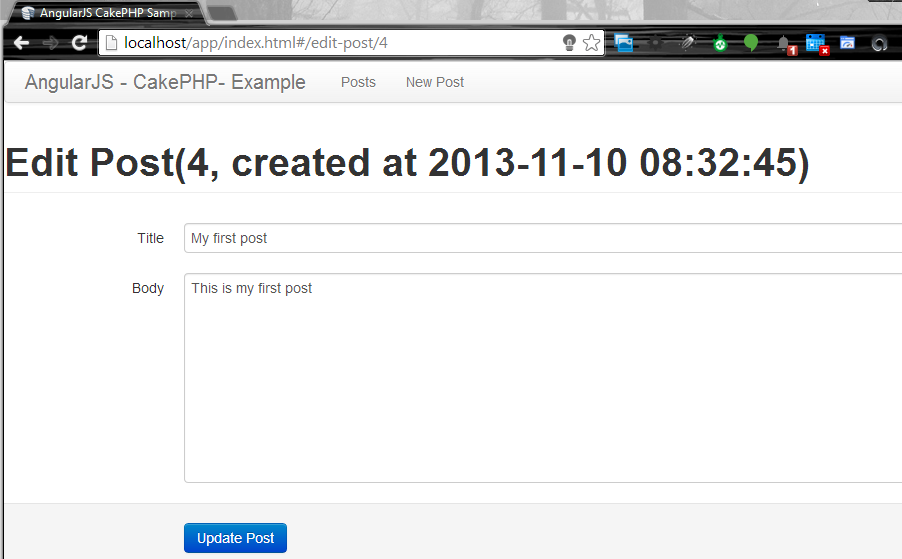
Try edit the new added post and save it.
AngularJS app edit post

Summary

The basic CRUD implementation in AngularJS is simple and stupid, and all data communicated with the backend is via REST/JSON which we have done in the last post.

Create a restful application with AngularJS and CakePHP(IV): Simple authentication and authorization

$
0
0

Simple authentication and authorization

Now we add the basic security feature to this application, such as login, logout, only the author of the certain Post can edit and delete it.

Prepare the tables

Create a users table, reuse the one from Blog tutorial.
CREATE TABLE users (
id INT UNSIGNED AUTO_INCREMENT PRIMARY KEY,
username VARCHAR(50),
password VARCHAR(50),
role VARCHAR(20),
created DATETIME DEFAULT NULL,
modified DATETIME DEFAULT NULL
);
Alter posts table, add a user_id column.
ALTER TABLE posts ADD COLUMN user_id INT(11);
Thus allow multi users to add posts.

Authentication

Create User model class.
class User extends AppModel {

public $validate = array(
'username' => array(
'required' => array(
'rule' => array('notEmpty'),
'message' => 'A username is required'
)
),
'password' => array(
'required' => array(
'rule' => array('notEmpty'),
'message' => 'A password is required'
)
),
'role' => array(
'valid' => array(
'rule' => array('inList', array('admin', 'author')),
'message' => 'Please enter a valid role',
'allowEmpty' => false
)
)
);

}
Modify the Post mdoel, add a belongsTo relation to User.
public $belongsTo = array('User');
Create UsersController class.
class UsersController extends AppController {

/**
* Components
*
* @var array
*/
public $components = array('Paginator', 'RequestHandler');

public function beforeFilter() {
parent::beforeFilter();
$this->Auth->allow('add', 'login'); // We can remove this line after we're finished
}

public function login() {
if ($this->Session->read('Auth.User')) {
$this->set(array(
'message' => array(
'text' => __('You are logged in!'),
'type' => 'error'
),
'_serialize' => array('message')
));
}

if ($this->request->is('get')) {
if ($this->Auth->login()) {
// return $this->redirect($this->Auth->redirect());
$this->set(array(
'user' => $this->Session->read('Auth.User'),
'_serialize' => array('user')
));
} else {
$this->set(array(
'message' => array(
'text' => __('Invalid username or password, try again'),
'type' => 'error'
),
'_serialize' => array('message')
));
$this->response->statusCode(401);
}
}
}

public function logout() {
if ($this->Auth->logout()) {
$this->set(array(
'message' => array(
'text' => __('Logout successfully'),
'type' => 'info'
),
'_serialize' => array('message')
));
}
}

/**
* index method
*
* @return void
*/
public function index() {
$this->User->recursive = 0;
$this->set('users', $this->Paginator->paginate());
}

/**
* view method
*
* @throws NotFoundException
* @param string $id
* @return void
*/
public function view($id = null) {
if (!$this->User->exists($id)) {
throw new NotFoundException(__('Invalid user'));
}
$options = array('conditions' => array('User.' . $this->User->primaryKey => $id));
$this->set('user', $this->User->find('first', $options));
}

/**
* add method
*
* @return void
*/
public function add() {
if ($this->request->is('post')) {
$this->User->create();
if ($this->User->save($this->request->data)) {
$this->set(array(
'message' => array(
'text' => __('Registered successfully'),
'type' => 'info'
),
'_serialize' => array('message')
));
} else {
$this->set(array(
'message' => array(
'text' => __('The user could not be saved. Please, try again.'),
'type' => 'error'
),
'_serialize' => array('message')
));
$this->response->statusCode(400);
}
}
}

}
The add method is use for user registration.
All methods are designated for REST resources. Modify the routes.php, add the following line.
Router::mapResources("users");
Next enable AuthComponent in AppController.
class AppController extends Controller {

public $components = array('Auth', 'Session');

public function beforeFilter() {
$this->Auth->authorize = array('Controller');
$this->Auth->authenticate = array(
'Basic'
);
}
}
CakePHP provides several built-in authentication approaches,Form, Basic, Digest. Form is the default authentication approach, but it is designated for authentication from web pages. Basic is the simplest way to authenticate user in a REST environment, which read a HTTP header includes a base64 hashed username and password pair. In the real world, you can use SSL together to improve the security.
There are some third party AuthComponents can be found on Github.com, such as support for the popular Oauth, OpenId protocols etc.
Now build the frontend login.html and LoginCtrl.
<div ng-controller="LoginCtrl">
<form>
<fieldset>
<div class="control-group">
<label class="control-label" for="username">Username</label>
<div class="controls">
<input type="text" id="username" ng-model="username" required="required" class="input-block-level"/>
</div>
</div>
<div class="control-group">
<label class="control-label" for="password">Password</label>
<div class="controls">
<input type="password" id="password" ng-model="password" required="required" class="input-block-level"/>
</div>
</div>
</fieldset>
<div class="form-actions">
<a ng-click="login()" class="btn btn-primary btn-block">Login</a>
<a class="link" href="#/register">Not Registered</a>
</div>
</form>
</div>
The following is the LoginCtrl.
as.controller('LoginCtrl', function($scope, $rootScope, $http, $location) {
$scope.login = function() {
$scope.$emit('event:loginRequest', $scope.username, $scope.password);
//$location.path('/login');
};
});
The login mehtod raise an event:loginRequest event. In the app.js, use a response interceptor to process the event.
$rootScope.$on('event:loginRequest', function(event, username, password) {

httpHeaders.common['Authorization'] = 'Basic ' + base64.encode(username + ':' + password);
$http.get($rootScope.appUrl + '/users/login.json')
.success(function(data) {
console.log('login data @' + data);
$rootScope.user = data.user;
$rootScope.$broadcast('event:loginConfirmed');
});

});
These code snippets are copied from another sample project hosted on github, it is a mature solution to process Basic authentication.
The register.html template.
<div ng-controller="RegisterCtrl">
<h1 class="page-header">Register <small>all fields are required.</small></h1>
<form ng-submit="register()">
<fieldset>
<div class="control-group">
<label class="control-label" for="email">Email</label>
<div class="controls">
<input id="emailAddress" type="email" class="input-block-level"
ng-model="user.email" required="true"></input>
</div>
</div>
<div class="control-group">
<label class="control-label" for="username">Username</label>
<div class="controls">
<input id="username" type="text" class="input-block-level"
ng-model="user.username" required="true"></input>
</div>
</div>
<div class="control-group">
<label class="control-label" for="password">Password</label>
<div class="controls">
<input id="password" type="password" class="input-block-level"
ng-model="user.password" required="true"></input>
</div>
</div>
</fieldset>
<div class=form-actions>
<input type="submit" class="btn btn-primary btn-block" value="Register"/>
</div>
</form>
</div>
The following is the content of RegisterCtrl.
as.controller('RegisterCtrl', function($scope, $rootScope, $http, $location) {

$scope.user = {};

$scope.register = function() {
console.log('call register');
var _data = {};
_data.User = $scope.user;
$http
.post($rootScope.appUrl + '/users/add.json', _data)
.success(function(data, status, headers, config) {
$location.path('/login');
})
.error(function(data, status, headers, config) {
});
}
});
When register a new account, the password field must be hashed before save into users table. CakePHP provides a model lifecycle hook beforeSave for this purpose.
public function beforeSave($options = array()) {
if (isset($this->data[$this->alias]['password'])) {
$this->data[$this->alias]['password'] = AuthComponent::password($this->data[$this->alias]['password']);
}
}

Authorization

CakePHP provides simple controller based authorization and complex AclComponent to provide fine grained authorization controls. In this application, use Controller based authorization
In the AppController, set authorize property value as Controller.
public function beforeFilter() {
$this->Auth->authorize = array('Controller');
//
}
Add a isAuthorized method in the AppController, this method defines global authorization rule for all controllers.
public function isAuthorized($user) {
if (isset($user['role']) && ($user['role'] == 'admin')) {
return true;
}
return false;
}
In the PostsController, add a method isAuthorized($user) which only affect actions defined in PostsController.
public function isAuthorized($user) {
// All registered users can add posts
if ($this->action === 'add') {
return true;
}

// The owner of a post can edit and delete it
if (in_array($this->action, array('edit', 'delete'))) {
$postId = $this->request->params['pass'][0];
if ($this->Post->isOwnedBy($postId, $user['id'])) {
return true;
}
}

return parent::isAuthorized($user);
}
In the PostsController, add the following line to add method.
public function add() {
$this->request->data['Post']['user_id'] = $this->Auth->user('id'); //

//
}
In the posts.html pages, try to display the author of the posts.
Add a new column in the table.
<table class="table">
<thead>
<tr>
...
<th>AUTHOR</th>
...
</tr>
</thead>
<tbody>
<tr ng-repeat="e in posts">
...
<td>{{e.User.username}}</td>
<td><a ng-click="editPost($index)" ng-show="user.id &&user.id==e.Post.user_id"><i
class="icon-pencil"></i>
</a>
 
<a ng-click="delPost($index)" ng-show="user.id &&user.id==e.Post.user_id"><i
class="icon-remove-circle"></i></a></td>
</tr>
</tbody>
</table>
I also changed the visibility of the edit and delete icon, only show when the logged in user is the author of the Post.
AngularJS app edit post

Summary

In these four posts, we have tried to implement a simple Blog application which has same features with the one from official CakePHP Blog tutorial, the difference is that AngularJS was selected to build the frontend pages instead of the CakePHP web pages, and CakePHP was used for producing backend REST API.

AngularJS CakePHP Sample codes

$
0
0

Introduction

This sample is a Blog application which has the same features with the official CakePHP Blog tutorial, the difference is AngularJS was used as frontend solution, and CakePHP was only use for building backend RESR API.

Technologies

AngularJS is a popular JS framework in these days, brought by Google. In this example application, AngularJS and Bootstrap are used to implement the frontend pages.
CakePHP is one of the most popular PHP frameworks in the world. CakePHP is used as the backend REST API producer.
MySQL is used as the database in this sample application.
A PHP runtime environment is also required, I was using WAMP under Windows system.

Post links

I assume you have some experience of PHP and CakePHP before, and know well about Apache server. Else you could read the official PHP introduction(php.net) and browse the official CakePHP Blog tutorial to have basic knowledge about CakePHP.
In these posts, I tried to follow the steps described in the CakePHP Blog tutorial to implement this sample application, and also reused the database schema of the tutorial.

Source codes

The project is hosted in my Github account, and follow the steps motioned in my posts to run it on Apache server:
Fork it!

Feedback

In further posts, I could add more content about these topics, especially, REST support in CakePHP. Any suggestion is welcome.

Create a restful application with AngularJS and Grails

$
0
0

Create a restful application with AngularJS and Grails

In this example application, I will create a simple application which basic CRUD operations, and I reused some AngularJS codes of theAngularJS CakePHP Sample.
I assume you have installed the latest JDK 7 and groovy SDK 2.1.9. And also installed Spring Groovy/Grails Toolsuite or an Eclipse based IDE plus Groovy/Grails plugin.

Create a Grails project

Download a copy of Grails distribution from Grails.org. And extract the files into your local disc.
Add <grails>/bin to the system PATH enviroment variable.
Create a project using the following command.
grails create-app <app name>
Enter the app folder root, try to run the project in the embeded tomcat server.
cd <app>
grails run-app
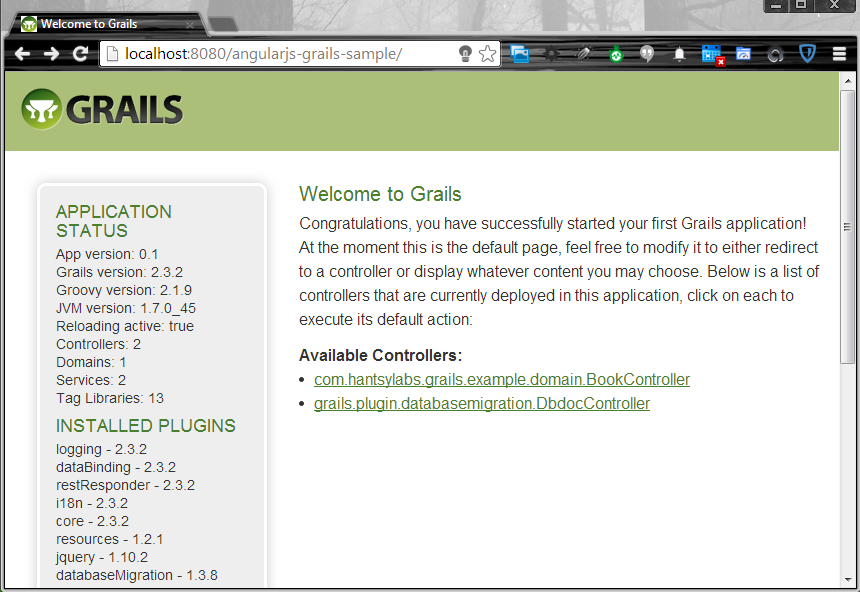
After it is deployed and running, you should see the following like info.
|Running Grails application
|Server running. Browse to http://localhost:8080/angularjs-grails-sample
If you are using Grails 2.3.2, you maybe encounter a critical bug which will cause the above command failed under Windows system.
java.lang.instrument ASSERTION FAILED ***: "!errorOutstanding" with message transform method call failed at ../../../src/share/instrument/JPLISAgent.c line: 844
This bug had been marked as Blocker priority, and should be fixed in the upcoming 2.3.3 soon.
More info please refer to GRAILS-10756.
In the comments of this issue, there is a solution provided to overcome this barrier temporarily.
Add the following dependency in the BuildConfig.groovy.
dependencies {
// specify dependencies here under either 'build', 'compile', 'runtime', 'test' or 'provided' scopes e.g.
// runtime 'mysql:mysql-connector-java:5.1.24'


build "org.fusesource.jansi:jansi:1.11"
}
Run grails run-app again, you should see the successful info in browser.
grails run-app

Explore the generated codes

By default, the generated project use H2 as database, and Hibernate 3 for the persistence layer. The Hibernate 4 support is included Grails 2.3 and also is ready in the generated codes.
In the BuildConfig.groovy file.
runtime ":hibernate:3.6.10.3" // or ":hibernate4:4.1.11.2"
And in the DataSource.groovy file.
cache.region.factory_class = 'net.sf.ehcache.hibernate.EhCacheRegionFactory' // Hibernate 3
// cache.region.factory_class = 'org.hibernate.cache.ehcache.EhCacheRegionFactory' // Hibernate 4
As you see, if you want to switch to Hibernate 4, what you need to do is only comment the Hibernate 3 facilities, and enable the Hibernate 4 alternatives.
Import the generated project as a Grails project into your IDE for the next steps.

Code the backend REST API

Create a entity Book.
grails create-domain-class Book
You can also create it from Eclipse Wizard step by step.
This command will generate Book.groovy and BookSpec.groovy test at the same time.
@Resource(uri='/books')
class Book {

String title
String author
Double price

static constraints = {
title blank:false
author blank:false
}
}
@Resource is a Grails specific annotation. An entity annotated with@Resource will be exposed as REST resource, the basic CRUD operations are ready for use.
URLHTTP MethodDescription
/books.jsonGETGet the list of Books
/books.jsonPOSTCreate a new Book
/books/:id.jsonGETGet the details of a Book
/books/:id.jsonPUTUpdate a Book by id
/books/:id.jsonDELETEDelete a Book by id
Open the BootStrap.groovy file, add some initial data.
def init = { servletContext ->
new Book(title:"Java Persistence with Hibernate", author:"Gavin King", price:99.00).save()
new Book(title:"Spring Live", author:"Matt Raible", price:29.00).save()
}
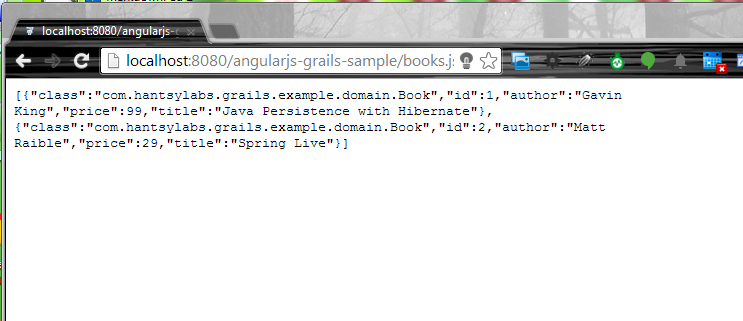
Run the application, open your browser, navigate tohttp://localhost:8080/angularjs-grails-sample/books.json.
books-json
Grails 2.3 also includes Controller based REST resource producing and other advanced REST features, which are explained in the official document.

Build the frontend AngularJS pages

I reuse the same file structure and some codes from the AngularJS CakePHP Sample directly.

Book List

The template code.
<div ng-controller="BookListCtrl">
<h1 class="page-header">Book List</h1>
<table class="table">
<thead>
<tr>
<th width="25px">ID</th>
<th>TITLE</th>
<th>PRICE</th>
<th>AUTHOR</th>
<th width="50px"></th>
</tr>
</thead>
<tbody>
<tr ng-repeat="e in books">
<td>{{e.id}}</td>
<td>{{e.title}}</td>
<td>{{e.price|currency}}</td>
<td>{{e.author}}</td>
<!-- ng-show="user.id &&user.id==e.user_id" -->
<td><a ng-click="editBook($index)"><i
class="icon-pencil"></i>
</a>
 
<a ng-click="delBook($index)"><i
class="icon-remove-circle"></i></a></td>
</tr>
</tbody>
</table>
<!-- ng-show="user.username" -->
<p>
<button type="button" class="btn btn-success"
ng-click="addBook()">
<b class="icon-plus-sign"></b>Add Book
</button>
</p>
</div>
The BookListCtrl code.
as.controller('BookListCtrl', function($scope, $rootScope, $http, $location) {
var load = function() {
console.log('call load()...');
$http.get($rootScope.appUrl + '/books.json')
.success(function(data, status, headers, config) {
$scope.books = data;
angular.copy($scope.books, $scope.copy);
});
}

load();

$scope.addBook = function() {
console.log('call addBook');
$location.path("/new");
}

$scope.editBook = function(index) {
console.log('call editBook');
$location.path('/edit/' + $scope.books[index].id);
}

$scope.delBook = function(index) {
console.log('call delBook');
var todel = $scope.books[index];
$http
.delete($rootScope.appUrl + '/books/' + todel.id + '.json')
.success(function(data, status, headers, config) {
load();
}).error(function(data, status, headers, config) {
});
}

});

Add a new Book

The template code.
<div ng-controller="NewBookCtrl">
<form class="form-horizontal">
<h1 class="page-header">New Book</h1>
<fieldset>
<div class="control-group">
<label class="control-label" for="title">Title</label>
<div class="controls">
<input id="title" type="text" class="input-block-level"
required="true" ng-model="book.title"></input>
</div>
</div>
<div class="control-group">
<label class="control-label" for="title">Author</label>
<div class="controls">
<input id="title" type="text" class="input-block-level"
required="true" ng-model="book.author"></input>
</div>
</div>
<div class="control-group">
<label class="control-label" for="title">Price</label>
<div class="controls">
<input id="title" type="number" class="input-block-level"
required="true" ng-model="book.price"></input>
</div>
</div>
</fieldset>
<div class="form-actions">
<button class="btn btn-primary" ng-click="saveBook()">Add
Book</button>
</div>
</form>
</div>
The NewBookCtrl code.
as.controller('NewBookCtrl', function($scope, $rootScope, $http, $location) {

$scope.book = {};

$scope.saveBook = function() {
console.log('call saveBook');
$http
.post($rootScope.appUrl + '/books.json', $scope.book)
.success(function(data, status, headers, config) {
$location.path('/books');
}).error(function(data, status, headers, config) {
});
}
});

Edit a Book

The template code.
<div ng-controller="EditBookCtrl">
<form class="form-horizontal">
<h1 class="page-header">Edit Book({{book.id}})</h1>
<fieldset>
<div class="control-group">
<label class="control-label" for="title">Title</label>
<div class="controls">
<input id="title" type="text" class="input-block-level"
required="true" ng-model="book.title"></input>
</div>
</div>
<div class="control-group">
<label class="control-label" for="title">Author</label>
<div class="controls">
<input id="title" type="text" class="input-block-level"
required="true" ng-model="book.author"></input>
</div>
</div>
<div class="control-group">
<label class="control-label" for="title">Price</label>
<div class="controls">
<input id="title" type="number" class="input-block-level"
required="true" ng-model="book.price"></input>
</div>
</div>
</fieldset>
<div class="form-actions">
<button ng-click="updateBook()" class="btn btn-primary">Update
Book</button>
</div>
</form>
</div>
The EditBookCtrl code.
as.controller('EditBookCtrl', function($scope, $rootScope, $http, $routeParams, $location) {

var load = function() {
console.log('call load()...');
$http.get($rootScope.appUrl + '/books/' + $routeParams['id'] + '.json')
.success(function(data, status, headers, config) {
$scope.book = data;
angular.copy($scope.book, $scope.copy);
});
}

load();

$scope.book = {};

$scope.updateBook = function() {
console.log('call updateBook');
$http
.put($rootScope.appUrl + '/books/' + $scope.book.id + '.json', $scope.book)
.success(function(data, status, headers, config) {
$location.path('/books');
}).error(function(data, status, headers, config) {
});
}
});

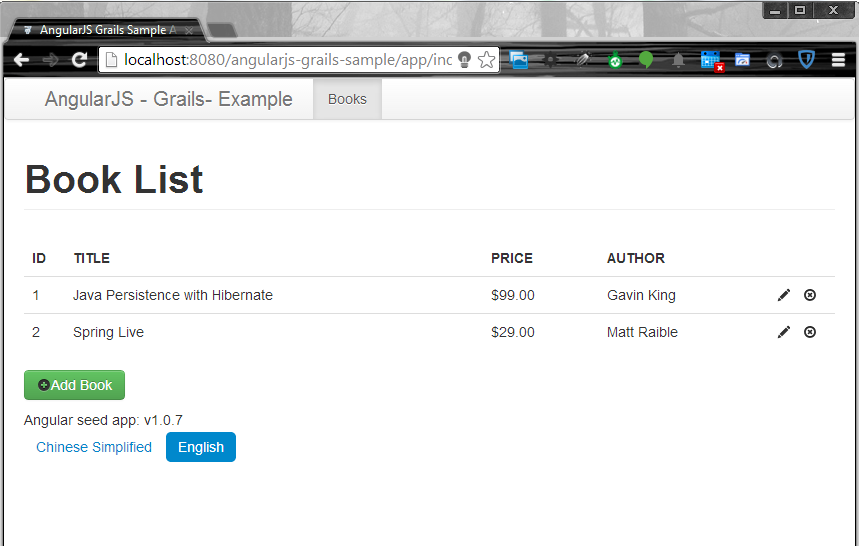
Browse the frontend UI

frontend-ui
Try add a new Book and edit and delete it.

Summary

In this example application, Grails was used to produce the backend REST API, it is also simple and stupid work. Currently, I have not added security feature, maybe add it in future.

Create a restful application with AngularJS and Zend 2 framework

$
0
0

Create a restful application with AngularJS and Zend 2 framework

This example application uses AngularJS/Bootstrap as frontend and Zend2 Framework as REST API producer.

The backend code

This backend code reuses the database scheme and codes of the official Zend Tutorial, and REST API support is also from the Zend community.
Zend2 provides a AbstractRestfulController for RESR API producing.
class AlbumController extends AbstractRestfulController {

public function getList() {
$results = $this->getAlbumTable()->fetchAll();
$data = array();
foreach ($results as $result) {
$data[] = $result;
}

return new JsonModel(array(
'data' => $data)
);
}

public function get($id) {
$album = $this->getAlbumTable()->getAlbum($id);
return new JsonModel(array("data" => $album));
}

public function create($data) {

$data['id']=0;
$form = new AlbumForm();
$album = new Album();
$form->setInputFilter($album->getInputFilter());
$form->setData($data);

$id=0;
if ($form->isValid()) {
$album->exchangeArray($form->getData());
$id = $this->getAlbumTable()->saveAlbum($album);
}else {
print_r( $form->getMessages());
}

return new JsonModel(array(
'data' => $id,
));
}

public function update($id, $data) {
$data['id'] = $id;
$album = $this->getAlbumTable()->getAlbum($id);
$form = new AlbumForm();
$form->bind($album);
$form->setInputFilter($album->getInputFilter());
$form->setData($data);

if ($form->isValid()) {
$id = $this->getAlbumTable()->saveAlbum($form->getData());
}

return new JsonModel(array(
'data' => $id,
));
}

public function delete($id) {
$this->getAlbumTable()->deleteAlbum($id);

return new JsonModel(array(
'data' => 'deleted',
));
}

protected $albumTable;

public function getAlbumTable() {
if (!$this->albumTable) {
$sm = $this->getServiceLocator();
$this->albumTable = $sm->get('Album\Model\AlbumTable');
}
return $this->albumTable;
}

}
The naming convention of the methods for REST API is listed in the following table.
URLHTTP MethodController MethodDescription
/albumsGETgetListGet the list of Albums
/albumsPOSTcreateCreate a new Album
/albums/:idGETgetGet the details of a Album
/albums/:idPUTudpateUpdate a Album by id
/albums/:idDELETEdeleteDelete a Album by id
Besides the naming convention, you have to set the routing rule to make it work.
Change the content of module/Album/config/module.config.php to the following.
<?php

return array(
'controllers' => array(
'invokables' => array(
'Album\Controller\Album' => 'Album\Controller\AlbumController',
),
),
// The following section is new and should be added to your file
'router' => array(
'routes' => array(
'album' => array(
'type' => 'segment',
'options' => array(
'route' => '/albums[/:id]',
'constraints' => array(
'id' => '[0-9]+',
),
'defaults' => array(
'controller' => 'Album\Controller\Album'
),
),
),
),
),
'view_manager' => array(
'strategies' => array(
'ViewJsonStrategy',
),
),
);

For producing REST API, it needs render a JSON view instead of the HTML view.

The frontend AngluarJS pages

It is very similar with the before AngularJS CakePHP application andAngularJS Grails application.
I do not want to duplicate the codes in this post, please checkout the codes github.com.

Run the application

Clone the source from github.com.
git clone https://github.com/hantsy/angularjs-zf2-sample
Run php composer.phar install to install the depencies automaticially. This applicalication also used Composer to manage the dependencies.
Create a vhost setting in Apache for this application, set the value of the DocumentRoot is <your application path>/public.
<VirtualHost *:80>
ServerName zf2-tutorial.localhost
DocumentRoot E:/MyWorks/hantsy-labs/angularjs-zf2-sample/public

SetEnv APPLICATION_ENV "development"
<Directory E:/MyWorks/hantsy-labs/angularjs-zf2-sample/public>
DirectoryIndex index.php
AllowOverride All
Order allow,deny
Allow from all
</Directory>
</VirtualHost>
Change the database setting(username and password) in theconfig/autoload/local.php.
return array(
'db' => array(
'username' => 'root',
'password' => '',
),
);
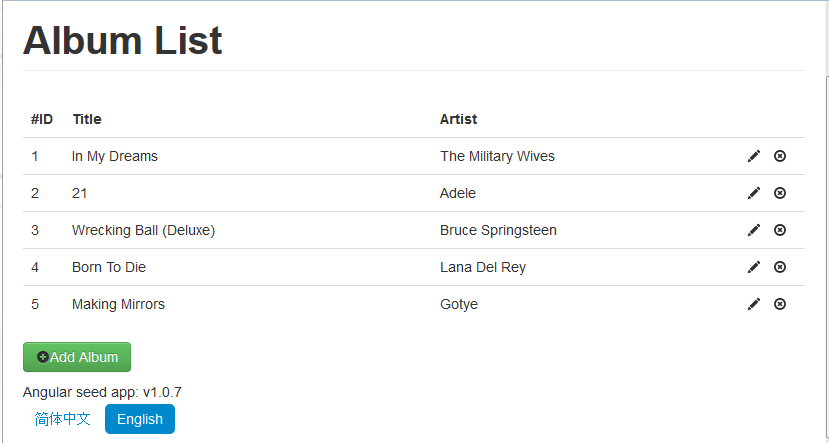
Start apache server.
albums

Sample codes

Clone the sources from my github.com.
git clone https://github.com/hantsy/angularjs-zf2-sample
And switch to stage1 branch.
git checkout stage1

Create a restful application with AngularJS and Zend 2 framework (2)

$
0
0

Replace the backend with Doctrine ORM

Doctrine is a very popular data access solution for PHP, it includes low level DBAL and high level OR mapping solution.
Doctrine has some Zend specific modules to support Doctrine in Zend based projects.
In this post, I will try replace the backend codes with Doctrine ORM.

Configure doctrine

Open the composer.json file, add doctrine as dependencies.
"doctrine/doctrine-orm-module":"0.*",
Update dependencies.
php composer.phar update
It could take some seconds, after it is executed successfully, there is adoctrine folder under the vendor folder.
Open config/application.config.php file, declare the DoctrineModuleand DoctrineORMModule.
'modules' => array(
// 'ZendDeveloperTools',
'DoctrineModule',
'DoctrineORMModule',
'Application',
'Album'
),
Open the album module config file/modlue/Album/config/module.config.php, add the following configuration for Doctrine.
'doctrine' => array(
'driver' => array(
'album_entities' => array(
'class' => 'Doctrine\ORM\Mapping\Driver\AnnotationDriver',
'cache' => 'array',
'paths' => array(__DIR__ . '/../src/Album/Model')
),
'orm_default' => array(
'drivers' => array(
'Album\Model' => 'album_entities'
)
)
)
)
Declare the database connection in a new standalonedoctrine.locale.php file.
return array(
'doctrine' => array(
'connection' => array(
'orm_default' => array(
'driverClass' => 'Doctrine\DBAL\Driver\PDOMySql\Driver',
'params' => array(
'host' => 'localhost',
'port' => '3306',
'user' => 'root',
'password' => '',
'dbname' => 'zf2tutorial',
)
)
)
)
);
Put this file into /config/autoload folder.

Create entity class

Change the content of Album entity class to the following.
namespace Album\Model;

use Doctrine\ORM\Mapping as ORM;

/**
* @ORM\Entity
*/
class Album {

/**
* @ORM\Id
* @ORM\GeneratedValue(strategy="AUTO")
* @ORM\Column(type="integer")
*/
private $id;

/** @ORM\Column(type="string") */
private $artist;

/** @ORM\Column(type="string") */
private $title;


public function getId() {
return $this->id;
}

public function getArtist() {
return $this->artist;
}

public function getTitle() {
return $this->title;
}

public function setId($id) {
$this->id = $id;
}

public function setArtist($artist) {
$this->artist = $artist;
}

public function setTitle($title) {
$this->title = $title;
}

}
The entity class is easy to be understood if you are a Java EE developer, the annotations are every similar with the JPA/Hibernate annotations.
You can use Doctrine command line tools to validate the schema declaration in the entity annotations.
vendor\bin\doctrine-module orm:validate-schema
Unlike the before Album class, Doctrine requires all the properties are private or protected.
You can also use Doctrine command line tools to generate the table from the annotations.
Remove the table album, and execute the following command.
vendor\bin\doctrine-module orm:schema-tool:create
It will generate a new fresh album table in the zf2tutorial database.

Create controller class

Change the content of the AlbumController to the following.
<?php

namespace Album\Controller;

use Album\Model\Album;
use Zend\Mvc\Controller\AbstractRestfulController;
use Zend\View\Model\JsonModel;

class AlbumController extends AbstractRestfulController {

public function getList() {
$em = $this
->getServiceLocator()
->get('Doctrine\ORM\EntityManager');

$results= $em->createQuery('select a from Album\Model\Album as a')->getArrayResult();


return new JsonModel(array(
'data' => $results)
);
}

public function get($id) {
$em = $this
->getServiceLocator()
->get('Doctrine\ORM\EntityManager');

$album = $em->find('Album\Model\Album', $id);

// print_r($album->toArray());
//
return new JsonModel(array("data" => $album->toArray()));
}

public function create($data) {
$em = $this
->getServiceLocator()
->get('Doctrine\ORM\EntityManager');

$album = new Album();
$album->setArtist($data['artist']);
$album->setTitle($data['title']);

$em->persist($album);
$em->flush();

return new JsonModel(array(
'data' => $album->getId(),
));
}

public function update($id, $data) {
$em = $this
->getServiceLocator()
->get('Doctrine\ORM\EntityManager');

$album = $em->find('Album\Model\Album', $id);
$album->setArtist($data['artist']);
$album->setTitle($data['title']);

$album = $em->merge($album);
$em->flush();

return new JsonModel(array(
'data' => $album->getId(),
));
}

public function delete($id) {
$em = $this
->getServiceLocator()
->get('Doctrine\ORM\EntityManager');

$album = $em->find('Album\Model\Album', $id);
$em->remove($album);
$em->flush();

return new JsonModel(array(
'data' => 'deleted',
));
}

}
The role of Doctrine\ORM\EntityManager is very similar with the JPAEntityManager. Doctrine\ORM\EntityManager was registered a Zend service by default, you can use it directly.
An issue I encountered is the find method returns a PHP object instead of an array, all properties of the Album object are declared asprivate, and return a object to client, the properties can not be serialized as JSON string.
I added a toArray method into the Album class to convert the object to an array, which overcomes this barrier temporarily.
public function toArray(){
return get_object_vars($this);
}
In the AlbumController, the return statement of the get method is changed to.
return new JsonModel(array("data" => $album->toArray()));
Another issue I encountered is I have to use the FQN name(Album\Model\Album) to access the Album entity in the query.
If you find where is configured incorrectly, please let me know. Thanks.

Sample codes

Clone the sample codes from my github.com:https://github.com/hantsy/angularjs-zf2-sample

Auditing with Hibernate Envers

$
0
0

Auditing with Hibernate Envers

The approaches provided in JPA lifecyle hook and Spring Data auditing only track the creation and last modification info of an Entity, but all the modification history are not tracked.
Hibernate Envers fills the blank table.
Since Hibernate 3.5, Envers is part of Hibernate core project.

Configuration

Configure Hibernate Envers in your project is very simple, just need to add hibernate-envers as project dependency.
<dependency>
<groupId>org.hibernate</groupId>
<artifactId>hibernate-envers</artifactId>
</dependency>
Done.
No need extra Event listeners configuration as the early version.

Basic Usage

Hibernate Envers provides a simple @Audited annotation, you can place it on an Entity class or property of an Entity.
@Audited
private String description;
If @Audited annotation is placed on a property, this property can be tracked.
@Entity
@Audited
public class Signup implements Serializable {...}
If annotate @Audited with an Entity class, all properties of this Entity will be tracked.
Hibernate will generate extra tables for the audited Entities.
By default, an table name ended with _AUD will be generated for the related Entity.
For example, Conference_AUD will be generated for entityConference.
The audit table copies all audited fields from the entity table, and adds two fields, REVTYPE and REV, and the value of REVTYPE could be add, mod, del.
Besides these, an extra table named REVINFO will be generated by default, it includes two important fields, REV and REVTSTMP, it records the timestamp of every revision.
When you do some queries on the audited info of an entity, it will select the _AUD table join the REVINFO table.
The Envers events will be fired when the transaction is synchronized. This will cause an issue when use @Transactional annotation if there are some operations in a transaction.
@Test
// @Transactional
public void retrieveConference() {

final Conference conference1 = newConference();

Conference conf1 = transactionTemplate
.execute(new TransactionCallback<Conference>() {

@Override
public Conference doInTransaction(TransactionStatus arg0) {
conference1.setSlug("test-jud");
conference1.setName("Test JUD");
conference1.getAddress().setCountry("US");
Conference reference = conferenceRepository
.save(conference1);
em.flush();
return reference;
}
});

// modifying description
assertTrue(null != conf1.getId());
final Conference conference2 = conferenceRepository
.findBySlug("test-jud");

log.debug("@conference @" + conference2);
assertTrue(null != conference2);

final Conference conf2 = transactionTemplate
.execute(new TransactionCallback<Conference>() {

@Override
public Conference doInTransaction(TransactionStatus arg0) {
conference2.setDescription("changing description...");
Conference result = conferenceRepository
.save(conference2);
em.flush();
return result;
}
});

log.debug("@conf2 @" + conf2);
// //modifying slug
// conference.setSlug("test-jud-slug");
// conference= conferenceRepository.save(conference);
// em.flush();
transactionTemplate.execute(new TransactionCallback<Conference>() {
@Override
public Conference doInTransaction(TransactionStatus arg0) {
AuditReader reader = AuditReaderFactory.get(em);

List<Number> revisions = reader.getRevisions(Conference.class,
conf2.getId());
assertTrue(!revisions.isEmpty());
log.debug("@rev numbers@" + revisions);
Conference rev1 = reader.find(Conference.class, conf2.getId(),
2);

log.debug("@rev 1@" + rev1);
assertTrue(rev1.getSlug().equals("test-jud"));
return null;
}
});

}
In this test method, TransactionTemplate is used to make the transaction be executed immediately.

Customize the revision info

Currently the REVINFO does not tracked the auditor of the certain revision, it is easy to customize the RevisionEntity to implement it.
Create a generic entity, add annotation @ResivionEntity.
@Entity
@RevisionEntity(ConferenceRevisionListener.class)
public class ConferenceRevisionEntity {
@Id
@GeneratedValue
@RevisionNumber
private int id;

@RevisionTimestamp
private long timestamp;

@ManyToOne
@JoinColumn(name="auditor_id")
private User auditor;
}
A @RevisionNumber annotated property and a @RevisionTimestampannotated property are required. Hibernate provides a@MappedSuperclass DefaultRevisionEntity class, you can extend it directly.
@Entity
@RevisionEntity(ConferenceRevisionListener.class)
public class ConferenceRevisionEntity extends DefaultRevisionEntity{

@ManyToOne
@JoinColumn(name="auditor_id")
private User auditor;
}
Create a custom RevisionListener class.
public class ConferenceRevisionListener implements RevisionListener {

@Override
public void newRevision(Object revisionEntity) {
ConferenceRevisionEntity entity=(ConferenceRevisionEntity) revisionEntity;
entity.setAuditor(SecurityUtils.getCurrentUser());
}

}
When create a new revision, set the auditor info. In the real project, it could be principal info from Spring Security.
Now you can query the ConferenceRevisionEntity like a generic Entity, and get know who have modified the entity for some certain revisions.
transactionTemplate.execute(new TransactionCallbackWithoutResult() {

@Override
protected void doInTransactionWithoutResult(TransactionStatus status) {
AuditReader reader = AuditReaderFactory.get(em);

List<Number> revisions = reader.getRevisions(Conference.class,
conf2.getId());
assertTrue(!revisions.isEmpty());
log.debug("@rev numbers@" + revisions);

ConferenceRevisionEntity entity=em.find(ConferenceRevisionEntity.class, revisions.get(0));


log.debug("@rev 1@" + entity);
assertTrue(entity.getAuditor().getId().equals(user.getId()));

}
});

Tracking property-level modification

You can track which audited properties are modified at the certain revision.
There are tow options to enable tracking of property-level modification.
Add the following configuration in the Hiberante/JPA configuration to enable it globally, and modification of all properties annotated with @Audited will be tracked.
org.hibernate.envers.global_with_modified_flag true
Or specify a withModifiedFlag attribute of @Audited, for example@Audited(withModifiedFlag=true), which will track modification of all properties when annotate it on an entity class, or only track the specified property if annotate it on a property of an entity class.
Hibernate Envers will generate an extra _MOD field for every audited field in the _AUD table, which provides a flag for the audited field to identify it is modified at the certain revision.
@NotNull
@Audited(withModifiedFlag=true)
private String description;

@NotNull
@Audited(withModifiedFlag=true)
private String slug;
In the following test, create a Conferenc object, only change thedescription of the Conference, and verify the modification ofdescription and slug.
transactionTemplate.execute(new TransactionCallbackWithoutResult() {

@Override
protected void doInTransactionWithoutResult(TransactionStatus status) {
AuditReader reader = AuditReaderFactory.get(em);

List<Number> revisions = reader.getRevisions(Conference.class,
conf2.getId());
assertTrue(!revisions.isEmpty());
log.debug("@rev numbers@" + revisions);
List list = reader
.createQuery()
.forEntitiesAtRevision(Conference.class,
revisions.get(0))
.add(AuditEntity.id().eq(conf2.getId()))
.add(AuditEntity.property("description").hasChanged())
.getResultList();

log.debug("@description list changed@" + list.size());
assertTrue(!list.isEmpty());

List slugList = reader
.createQuery()
.forEntitiesAtRevision(Conference.class,
revisions.get(0))
.add(AuditEntity.id().eq(conf2.getId()))
.add(AuditEntity.property("slug").hasChanged())
.getResultList();

log.debug("@slugList 1@" + slugList.size());
assertTrue(!slugList.isEmpty());

list = reader
.createQuery()
.forEntitiesAtRevision(Conference.class,
revisions.get(1))
.add(AuditEntity.id().eq(conf2.getId()))
.add(AuditEntity.property("description").hasChanged())
.getResultList();

log.debug("@description list changed@" + list.size());
assertTrue(!list.isEmpty());

slugList = reader
.createQuery()
.forEntitiesAtRevision(Conference.class,
revisions.get(1))
.add(AuditEntity.id().eq(conf2.getId()))
.add(AuditEntity.property("slug").hasChanged())
.getResultList();

log.debug("@slugList 1@" + slugList.size());
assertTrue(slugList.isEmpty());
}
});

Tracking entity type modification

There are several ways to track the modification of the entity class.
  1. set org.hibernate.envers.trackentitieschangedinrevision to true in Hibernate/JPA configuration. Hibernate will generate aREVCHANGES to record the change of the entity name.
  2. Create a custom revision entity that extendsorg.hibernate.envers.DefaultTrackingModifiedEntitiesRevisionEntityclass.
 @Entity
@RevisionEntity
public class ExtendedRevisionEntity
extends DefaultTrackingModifiedEntitiesRevisionEntity {
...
}
  1. In your custom revision entity, create a Set<String> property, annotate it with @org.hibernate.envers.ModifiedEntityNamesannotation.
 @Entity
@RevisionEntity
public class ConferenceTrackingRevisionEntity {
...

@ElementCollection
@JoinTable(name = "REVCHANGES", joinColumns = @JoinColumn(name = "REV"))
@Column(name = "ENTITYNAME")
@ModifiedEntityNames
private Set<String> modifiedEntityNames;

...
}

A glance at Spring Data Envers project

There is an incubator project named Spring Data Envers under Spring Data which extends Spring Data JPA, and integrate Hibernate Envers with Spring Data JPA.
Add spring-data-envers as your project dependency.
<dependency>
<groupId>org.springframework.data</groupId>
<artifactId>spring-data-envers</artifactId>
<version>0.2.0.BUILD-SNAPSHOT</version>
</dependency>
Set factory-class attribute to~.EnversRevisionRepositoryFactoryBean in <jpa-repositories/>. You have to use it to enable Spring Data Envers.
<jpa:repositories base-package="com.hantsylabs.example.spring.jpa"
factory-class="org.springframework.data.envers.repository.support.EnversRevisionRepositoryFactoryBean"></jpa:repositories>
There is an extra ResivionRepository interface from Spring Data Commons which provides the capability of querying the entity revision info.
public interface RevisionRepository<T, ID extends Serializable, N extends Number & Comparable<N>> {

Revision<N, T> findLastChangeRevision(ID id);

Revisions<N, T> findRevisions(ID id);

Page<Revision<N, T>> findRevisions(ID id, Pageable pageable);
}
Revision and Revisions are from Spring Data Commons. The former envelopes the revision info, such as revision number, revision date, and related Entity data snapshot. The later is an iterator of theRevision.
Make your repository extend RevisionRepository.
@Repository
public interface SignupRepository extends RevisionRepository<Signup, Long, Integer>,
JpaRepository<Signup, Long>{

Signup findByConference(Conference conference);

Signup findById(Long id);

}
Have a try now.
@Test
// @Transactional
public void retrieveSignupRevision() {

final Signup signup = newSignup();

final Signup signup2 = transactionTemplate
.execute(new TransactionCallback<Signup>() {

@Override
public Signup doInTransaction(TransactionStatus arg0) {
signupRepository.save(signup);
em.flush();
return signup;
}
});

// modifying description
assertTrue(null != signup2.getId());

log.debug("@Signup @" + signup2);
assertTrue(null != signup2);

transactionTemplate.execute(new TransactionCallbackWithoutResult() {

@Override
protected void doInTransactionWithoutResult(TransactionStatus status) {
Revisions<Integer, Signup> revision = signupRepository
.findRevisions(signup2.getId());

assertTrue(!revision.getContent().isEmpty());

Revision<Integer, Signup> lastRevision = signupRepository
.findLastChangeRevision(signup2.getId());

assertTrue(lastRevision.getRevisionNumber()==1);

}
});

}

Sample codes

The codes are hosted on my github.com account.

Modeling with Doctrine

$
0
0

Modeling with Doctrine

In this post, we try to use Doctrine to make the models richer, and make it more like a real world application.

Overview

Imagine there are several models in this application, Album, Artist, Song, Person.
An Artist could compose many Albums.
An Album could be accomplished by more than one Artist.
An Album includes several Songs.
An Artist is a generalized Person.
In Doctrine ORM, it is easy to describe the relation between models.
Album and Artist is a ManyToMany relation.
Album and Song is a OneToMany relation.
Artist is inherited from Person.

Codes of Models

The code of Album class.
/**
* @ORM\Entity
*/
class Album {

/**
* @ORM\Id
* @ORM\GeneratedValue(strategy="AUTO")
* @ORM\Column(type="integer")
*/
private $id;

/** @ORM\Column(type="string") */
private $title;

/**
* @ORM\ManyToMany(targetEntity="Artist", inversedBy="albums")
* @ORM\JoinTable(name="albums_artists",
* joinColumns={@ORM\JoinColumn(name="album_id", referencedColumnName="id")},
* inverseJoinColumns={@ORM\JoinColumn(name="artist_id", referencedColumnName="id")}
* )
*/
private $artists;

/**
* @ORM\OneToMany(targetEntity="Song", mappedBy="album", cascade="ALL", orphanRemoval=true, fetch="EXTRA_LAZY")
*/
private $songs;

/**
* @ORM\ElementCollection(tableName="tags")
*/
private $tags;

public function __construct() {
$this->songs = new ArrayCollection();
$this->artists = new ArrayCollection();
$this->tags = new ArrayCollection();
}

...
}
Note, in the __construct method, songs and artists are initialized as ArrayCollection. It is required by Doctrine ORM.
/**
* @ORM\Entity
*/
class Song {

/**
* @ORM\Id
* @ORM\GeneratedValue(strategy="AUTO")
* @ORM\Column(type="integer")
*/
private $id;

/** @ORM\Column(type="string") */
private $name;

/** @ORM\Column(type="string") */
private $duration;

/**
* @ORM\ManyToOne(targetEntity="Album", inversedBy="songs")
* @ORM\JoinColumn(name="album_id") */
private $album;
}
Album and Song a bidirectional OneToMany relation.
/**
* @ORM\Entity
* @ORM\InheritanceType("JOINED")
* @ORM\DiscriminatorColumn(name="person_type", type="string")
* @ORM\DiscriminatorMap({"A"="Artist", "P"="Person"})
*/
class Person {

/**
* @ORM\Id
* @ORM\GeneratedValue(strategy="AUTO")
* @ORM\Column(type="integer")
*/
private $id;

/** @ORM\Column(type="string") */
private $name;

public function getId() {
return $this->id;
}

public function getName() {
return $this->name;
}

public function setId($id) {
$this->id = $id;
}

public function setName($name) {
$this->name = $name;
}

}

/**
* @ORM\Entity
*/
class Artist extends Person{

/**
*
* @ORM\ManyToMany(targetEntity="Album", mappedBy="artists")
*/
private $albums;

public function __construct() {
$this->albums=new ArrayCollection();
}
}
Artist is derived from Person, and inherits all features from Person.
All the above codes, the setters and getters are omitted.
All the definition are very similar with JPA/Hibernate.
Doctrine supports two options of InheritanceType, SINGLE_TABLE and JOINED.
Generate the tables via doctrine command line tools.
vendor\bin\doctrine-module orm:schema-tool:create
if you are work on the database we used in before posts, use the following command instead.
vendor\bin\doctrine-module orm:schema-tool:update --force
This will synchronize the current schema with models.
Try to compare the generated tables when use SINGLE_TABLE and JOINED. The former only generate one table for Artist and Person. The later generate two tables for Artistand Person, the common fields and the discriminator field are included in the person table, when perform a query on Artist, it will join the two tables(artist and person) by primary key, and return the result.

Display details of an album

Now, create a details page to display the details of an album.
Ideally, a details page could include an cover image(use a dummy image here), album title, count of songs, artists, and the complete Song list.
By default, the relations of Artist and Song are LAZY. lazy is a very attractive feature when you access the related property which will be loaded on demand. But in RESTful architecture, the return result is generated by JSON/XML and sent to client. It is impossible access the unloaded relation as expected.
Update the get method of AlbumController, we have to fetch the related properties together.
public function get($id) {
$em = $this
->getServiceLocator()
->get('Doctrine\ORM\EntityManager');

$album = $em->find('Album\Model\Album', $id);

$results= $em->createQuery('select a, u, s from Album\Model\Album a join a.artists u join a.songs s where a.id=:id')
->setParameter("id", $id)
->getArrayResult();

//print_r($results);

return new JsonModel($results[0]);
}
Use a Doctrine specific fetch join to get album by id, and the related artists, songs in the same query.
Create a new album.html page.
<div ng-controller="AlbumCtrl">

<div class="row-fluid">
<div class="span3">
<img src="../../app/img/holder.png" width="128" height="128">
</div>
<span class="span9">
<h2>{{album.title}}</h2>
<p>{{album.songs.length}} SONGS, <span ng-repeat="u in album.artists">{{u.name}}</span></p>
</span>
</div>
<table class="table">
<thead>
<tr>
<th>NAME</th>
<th width="50px">DURATION</th>
</tr>
</thead>
<tbody>
<tr ng-repeat="e in album.songs">
<td>{{e.name}}</td>
<td>{{e.duration}}</td>
</tr>
</tbody>
</table>

<p>
<a href="#/albums" class="btn btn-success">
<b class="icon-home"></b>Back to Album List
</a>
</p>
</div>
Add album routing and album controller.
//app.js
$routeProvider
.....
.when('/album/:id', {templateUrl: 'partials/album.html', controller: 'AlbumCtrl'})
//controllers.js
as.controller('AlbumCtrl', function($scope, $rootScope, $http, $routeParams, $location) {
$scope.album = {};

var load = function() {
console.log('call load()...');
$http.get($rootScope.appUrl + '/albums/' + $routeParams['id'])
.success(function(data, status, headers, config) {
$scope.album = data;
});
};

load();
});
Add some sample data, and run the project on Apache server.
album page

Sample codes

Clone the sample codes from my github.com: https://github.com/hantsy/angularjs-zf2-sample

JPA 2.1 Schema generation properties

$
0
0

JPA 2.1 Schema generation properties

If you have some experience of Hibernate before, you must have used Hibernatehibernate.hbm2ddl.auto property to maintain the database schema for your project and used import.sql to initialize test data into the database.
Luckily this feature is standardized in JPA 2.1
JPA 2.1 added a series of properties for database schema maintenance and generation.

Maintain database schema

Let's create a simple Entity as example.
@Entity
@Table(name="POSTS")
public class Post implements Serializable {
private static final long serialVersionUID = 1L;
@Id
@GeneratedValue(strategy = GenerationType.AUTO)
@Column(name="ID")
private Long id;

@Column(name="TITLE")
private String title;

@Column(name="BODY")
private String body;

@Temporal(javax.persistence.TemporalType.DATE)
@Column(name="CREATED")
private Date created;
}
A simple Post class, includes three properties, title, body, created, and additional id.
An example of persitence.xml.
<?xml version="1.0" encoding="UTF-8"?>
<persistence version="2.1"
xmlns="http://xmlns.jcp.org/xml/ns/persistence"
xmlns:xsi="http://www.w3.org/2001/XMLSchema-instance"
xsi:schemaLocation="http://xmlns.jcp.org/xml/ns/persistence http://xmlns.jcp.org/xml/ns/persistence/persistence_2_1.xsd">
<persistence-unit name="postpu" transaction-type="JTA">
<properties>
<property name="javax.persistence.schema-generation.database.action" value="drop-and-create"/>
<property name="javax.persistence.schema-generation.create-source" value="script"/>
<property name="javax.persistence.schema-generation.drop-source" value="script"/>
<property name="javax.persistence.schema-generation.drop-script-source" value="META-INF/drop-script.sql"/>
<property name="javax.persistence.schema-generation.create-script-source" value="META-INF/create-script.sql"/>
<property name="javax.persistence.sql-load-script-source" value="META-INF/load-script.sql"/>
<property name="eclipselink.logging.level" value="FINE"/>
</properties>
</persistence-unit>
</persistence>
javax.persistence.schema-generation.database.action defines the strategy will perform on database artifacts(tables, constraints etc). The value options are none, create, drop, create-and-drop.
javax.persistence.schema-generation.create-source specifies how to create these artifacts, the value could be script, metadata, script-then-metadata, metadata-then-script, which indicates the artifacts will be created from scripts or entity metadata, or scripts firstly then metadata, or metadata firstly then scripts. If script is specified, you can define anotherjavax.persistence.schema-generation.create-script-source property to locate the script.
javax.persistence.schema-generation.drop-source and javax.persistence.schema-generation.drop-script-source are easy to understand, which define the strategy to drop the artifacts.
javax.persistence.sql-load-script-source will initialize some test data into the database.
The following are samples of the three scripts.
The content of create-script.sql.
CREATE TABLE POSTS("ID" INTEGER NOT NULL PRIMARY KEY, "TITLE" VARCHAR(255), "BODY" VARCHAR(2000), "CREATED" DATE)
The content of drop-script.sql.
DROP TABLE POSTS
The content of load-script.sql.
INSERT INTO POSTS("ID", "TITLE", "BODY", "CREATED") VALUES (1, 'First Post', 'Body of first post', '2013-11-27')
INSERT INTO POSTS("ID", "TITLE", "BODY", "CREATED") VALUES (2, 'Second Post', 'Body of second post', '2013-11-27')
INSERT INTO POSTS("ID", "TITLE", "BODY", "CREATED") VALUES (3, 'Third Post', 'Body of third post', '2013-11-27')
When you run this project on Glassfish 4, you will see the sample data is loaded successfully at runtime.
NOTE, you could notice we have not defined a DataSource in the persistence.xml. Java EE 7 specs added a series of default resources, including Jdbc, JMS etc. If there is no Jdbc DataSource specified, the application will search the default Jdbc DataSource via JNDI name java:/comp/DefaultDataSource, it should be provided in any Java EE certificated application servers.
In the above example we use scripts to manage the tables. If you prefer models(aka metadata) to manage the database schema, there is an example.
<persistence version="2.1"
xmlns="http://xmlns.jcp.org/xml/ns/persistence"
xmlns:xsi="http://www.w3.org/2001/XMLSchema-instance"
xsi:schemaLocation="http://xmlns.jcp.org/xml/ns/persistence http://xmlns.jcp.org/xml/ns/persistence/persistence_2_1.xsd">
<persistence-unit name="postpu" transaction-type="JTA">
<properties>
<property name="javax.persistence.schema-generation.database.action" value="drop-and-create"/>
<property name="javax.persistence.schema-generation.create-source" value="metadata"/>
<property name="javax.persistence.schema-generation.drop-source" value="metadata"/>
<property name="javax.persistence.sql-load-script-source" value="META-INF/load-script.sql"/>
<property name="eclipselink.logging.level" value="FINE"/>
</properties>
</persistence-unit>
</persistence>
This example is similar with Hibernate drop-create strategy.

Generate database schema

JPA 2.1 provides capability to generate the existing database schema into external resource.
There is an example of the usage from EclipseLink project wiki.
Map properties = new HashMap();
properties.put("javax.persistence.database-product-name", "Oracle");
properties.put("javax.persistence.database-major-version", 12);
properties.put("javax.persistence.database-minor-version", 1);
properties.put("javax.persistence.schema-generation.scripts.action", "drop-and-create");
properties.put("javax.persistence.schema-generation.scripts.drop-target", "jpa21-generate-schema-no-connection-drop.jdbc");
properties.put("javax.persistence.schema-generation.scripts.create-target", "jpa21-generate-schema-no-connection-create.jdbc");

Persistence.generateSchema("default", properties);
Try it yourself

Summary

This feature is good, but it lack an equivalent action to Hibernate update strategy. And the naming of these properties is very bad, I have to research the JPA document to differentiate their usage.
The sample codes are hosted on my github.com account, check out and play it yourself.

JPA 2.1: Bulk Update and Delete

$
0
0

JPA 2.1: Bulk Update and Delete

In the JPA 2.0 and early version, if you want to execute a bulk updating query, you have to use update or delete clause in JPQL directly. JPA 2.1 introduce new Criteria API for updating and deleting.

Post entity

Reuse the Post entity class as example. Add an extra boolean approved property.
In this example, the bulk update operation will set the approved value to true.
@Entity
@Table(name="POSTS")
public class Post implements Serializable {

private boolean approved = false;
}

Criteria Update and Delete API

In JPA 2.1, new CriteriaUpdate and CriteriaDelete are introduced in Criteria API for updating and deleting. The usage is very simple.
The CriteriaUpdate example.
CriteriaBuilder cb = em.getCriteriaBuilder();
CriteriaUpdate<Post> q = cb.createCriteriaUpdate(Post.class);
Root<Post> root = q.from(Post.class);
q.set(root.get("approved"), true)
.where(root.get("id").in(getCheckedList()));

int result = em.createQuery(q).executeUpdate();
log.info("update @" + result);
The CriteriaDelete example.
CriteriaBuilder cb = em.getCriteriaBuilder();
CriteriaDelete<Post> q = cb.createCriteriaDelete(Post.class);
Root<Post> root = q.from(Post.class);
q.where(root.get("id").in(checkedList));

int result = em.createQuery(q).executeUpdate();
log.info("delete @" + result);
The checkedList value is from checkbox values from JSF UI.

Summary

This feature is a small improvement to JPA API. If you are stick on the type-safe JPA metadata API for JPA programming, it is a big step.
The sample codes are hosted on my github.com account, check out and play it yourself.
When you run the project(jpa-bulk) on Glassfish 4.0 and you could get an exception.
java.lang.RuntimeException: unable to create policy context directory.
There is a known issue in Glassfish 4.0, the fix should be included in the next release. I am using a Nightly version to overcome this barrier temporarily.

JPA 2.1: Attribute Converter

$
0
0

JPA 2.1: Attribute Converter

If you are using Hibernate, and want a customized type is supported in your Entity class, you could have to write a custom Hibernate Type.
JPA 2.1 brings a new feature named attribute converter, which can help you convert your custom class type to JPA supported type.

Create an Entity

Reuse the Post entity class as example.
@Entity
@Table(name="POSTS")
public class Post implements Serializable {
private static final long serialVersionUID = 1L;
@Id
@GeneratedValue(strategy = GenerationType.AUTO)
@Column(name="ID")
private Long id;

@Column(name="TITLE")
private String title;

@Column(name="BODY")
private String body;

@Temporal(javax.persistence.TemporalType.DATE)
@Column(name="CREATED")
private Date created;

@Column(name="TAGS")
private List<String> tags=new ArrayList<>();
}

Create an attribute converter

In this example, we try to store the tags property into one column instead of an external table.
Create an attribute converter, it should be annotated with @Converter and implementsAttributeConverter interface.
@Converter
public class ListToStringConveter implements AttributeConverter<List<String>, String> {

@Override
public String convertToDatabaseColumn(List<String> attribute) {
if (attribute == null || attribute.isEmpty()) {
return "";
}
return StringUtils.join(attribute, ",");
}

@Override
public List<String> convertToEntityAttribute(String dbData) {
if (dbData == null || dbData.trim().length() == 0) {
return new ArrayList<String>();
}

String[] data = dbData.split(",");
return Arrays.asList(data);
}
}
It is easy to understand, the tags property will be converted into a comma based string when it is stored into database, and tags field value of POSTS table will be converted into a List when it is fetched from database.

Apply Converter

You can use the autoApply attribute of the Converter to apply the converter to any supported type.
@Converter(autoApply=true)
public class ListToStringConveter implements AttributeConverter<List<String>, String> {...}
It is dangerous in a real world project when there are some List you do not want to be converted.
Alternatively, you can apply it on the property via a @Convert annotation.
@Column(name="TAGS")
@Convert(converter = ListToStringConveter.class)
private List<String> tags=new ArrayList<>();
You can also place it on class.
@Converts(value={
@Convert(attributeName="tags", converter = ListToStringConveter.class)
})
public class Post implements Serializable {...}
An extra attributeName must be specified. You can declare several Converters for properties on an Entity class.
Converters also can be applied on:
  1. @Embeddable key of a OneToMany Map type property.
  2. @Embeded property
  3. @ElementCollection property

Summary

This feature is very useful when you want use a JPA supported type to store your custom class, especially, convert an unsupported type to JPA support type, for example, such as Joda Datetime/Java 8 new Date objects are not supported in JPA 2.1 yet, you can use a converter to convert it to java.util.Date type which is supported by JPA.
The sample codes are hosted on my github.com account, check out and play it yourself.
When you run the project(jpa-converter) on Glassfish 4.0 and you could get an exception.
java.lang.RuntimeException: unable to create policy context directory.
There is a known issue in Glassfish 4.0, the fix should be included in the next release. I am using a Nightly version to overcome this barrier temporarily.

JPA 2.1: Entity Graph

$
0
0

JPA 2.1: Entity Graph

Entity Graph is a means to specify the structure of a graph of entities, it defines the return path and boundaries when the entity is loaded.

Define Entity Graph

You can define an Entity graph via @NamedEntityGraph annotation.
@NamedEntityGraph(
name = "post",
attributeNodes = {
@NamedAttributeNode("title"),
@NamedAttributeNode(value = "comments", subgraph = "comments")
},
subgraphs = {
@NamedSubgraph(
name = "comments",
attributeNodes = {
@NamedAttributeNode("content")}
)
}
)
or create a EntityGraph dynamically via createEntitGraph method of EntityManager.
EntityGraph postEntityGraph=em.createEntityGraph(Post.class);
postEntityGraph.addAttributeNodes("title");
postEntityGraph.addSubgraph("comments").addAttributeNodes("content");

Apply the Entity Graph

Get the EntityGraph.
EntityGraph postGraph=em.getEntityGraph("post");
Set the value of javax.persistence.fetchgraph
em.createQuery("select p from Post p where p.id=:id", Post.class)
.setHint("javax.persistence.fetchgraph", postGraph)
.setParameter("id", this.id)
.getResultList()
.get(0);
There are two hints available in JPA 2.1 for configuring the Entity Graph loading strategy.
javax.persistence.fetchgraph will load all attributes defined in the EntityGraph, and all unlisted attributes will use LAZY to load.
javax.persistence.loadgraph will load all attributes defined in the EntityGraph, and all unlisted attributes will apply it's fetch settings.

What problem it resolved

If you are using Hibernate, you have to encounter the famous LazyInitializedExcpetion when you try to fetch values from association attributes of an entity outside of an active Session.
There are some existed solutions to resolve this problem. In a web application, most of case, this exception could be thrown in the view layer, one solution is introduce Open Session in View pattern, in Spring application, an OpenInView AOP Interceptor(for none web application) and an OpenInView web Filter(for web application) are provided.
Now, the Entity Graph could be another robust solution for resolving this issue. For those cases which require to hint the lazy association of an Entity, create a Entity Graph to load them when the query is executed.
Some JPA providers, such as OpenJPA, provide a Fetch Plan feature, which is similar with the Entity Graph.

Summary

The Entity Graph overrides the default loading strategy, and provides flexibility of loading the association attributes of an Entity.
The sample codes are hosted on my github.com account, check out and play it yourself.

JPA 2.1: Treat

$
0
0

JPA 2.1: Treat

JPA 2.1 introduces a new keyword treat in JPQL which allow path expressions to be treated as a subclass, giving access to subclass specific state.
Create two specified Comments, VoteUp and VoteDown.
@Entity
public class VoteUp extends Comment{

public VoteUp() {
super("Up");
}

}
@Entity
public class VoteDown extends Comment{

public VoteDown() {
super("Down");
}

}
Add an @Inheritance annotation on Comment entity.
@Entity
@Inheritance(strategy = InheritanceType.JOINED)
public class Comment implements Serializable {
}
In the ViewPostBean, fetch the counts of voteUp comments and voteDown comments.
private void fetchVoteDown() {
this.voteDown = ((Long) (em.createQuery("select count(vu)from Post p join treat(p.comments as VoteDown) vu where p.id=:id")
.setParameter("id", this.id)
.getSingleResult())).intValue();
}

private void fetchVoteUp() {
this.voteUp = ((Long) (em.createQuery("select count(vu)from Post p join treat(p.comments as VoteUp) vu where p.id=:id")
.setParameter("id", this.id)
.getSingleResult())).intValue();
}
Also create a voteUp() and voteDown() methods to create VoteUp and VoteDown objects.
public void voteUp() {
final VoteUp comment = new VoteUp();
comment.setPost(this.post);
this.post.getComments().add(comment);

em.merge(this.post);
em.flush();

fetchVoteUp();
}

public void voteDown() {
final VoteDown comment = new VoteDown();
comment.setPost(this.post);
this.post.getComments().add(comment);

em.merge(this.post);
em.flush();

fetchVoteDown();
}
The sample codes are hosted on my github.com account, check out and play it yourself.

JPA 2.1: Unsynchronized Persistence Contexts

$
0
0

JPA 2.1: Unsynchronized Persistence Contexts

In JPA 2.0 and the early version, any change of the data will be synchronized into database at the transaction is committed.
JPA 2.1 introduced a synchronization attribute in @PersistenceContext annotation when it's value is SynchronizationType.UNSYNCHRONIZED, you have to call joinTransaction to synchronize the data into database manually.
@PersistenceContext(synchronization = SynchronizationType.UNSYNCHRONIZED)
EntityManager em;
Compare the two methods.
public void save() {
final Comment comment = new Comment(this.commentBody);
comment.setPost(this.post);
this.post.getComments().add(comment);
em.merge(this.post);

this.commentBody="";
}

public void saveWithJoinTransaction() {
final Comment comment = new Comment(this.commentBody);
comment.setPost(this.post);
this.post.getComments().add(comment);

em.joinTransaction();
em.merge(this.post);

this.commentBody="";
}
Conceptually, this feature is a little similar with Hibernate's FlushMode. If you have used Seam 2, you could be impressed of the Hibernate FlushMode feature. In Seam 2, it allow you flush data manually in some case. For example, perform a series of steps in a flow, the data change will be cached and be committed in the last step, and allow you give up any change if exit the flow.
The sample codes are hosted on my github.com account, check out and play it yourself.

JPA 2.1: Programmatic Named Queries

$
0
0

JPA 2.1: Programmatic Named Queries

In JPA 2.0 or the early version, you can define a named query by add a @NamedQueryannotation on the entity class.
JPA 2.1 brings a new programmatic approach to create a named query dynamically.
@Startup
@Singleton
public class ApplicationInitializer {

@PersistenceContext
EntityManager em;

@PostConstruct
public void postConstruct(){
System.out.println("@@@application is iniitlized...");
Query query = em.createQuery("select count(vu)from Post p join treat(p.comments as VoteUp) vu where p.id=:id");
em.getEntityManagerFactory().addNamedQuery(Constants.NQ_COUNT_VOTE_UP, query);
}

}
In the above the codes, use a @Singleton EJB to create the named queries at EJB@Startup stage.
Replace the query string in the voteUp method with the following content.
private void fetchVoteUp() {

this.voteDown = ((Long) (em.createNamedQuery(Constants.NQ_COUNT_VOTE_UP)
.setParameter("id", this.id)
.getSingleResult())).intValue();
}
The sample codes are hosted on my github.com account, check out and play it yourself.

JPA 2.1: CDI Support

$
0
0

JPA 2.1: CDI Support

In JPA 2.0 or the early version, you can not @Inject a CDI bean into JPA facilities.
Utilize Apache CODI or JBoss Seam 3, @Inject could be supported in Entity Listenerclasses.
Luckily, JPA 2.1 bring native CDI support.
Have a look at the PostListener in the jpa-converter example.
public class PostListener {

@Inject
Logger log;

@PrePersist
public void prePresist(Object o) {
log.info("call prePresist");
if (o instanceof Post) {
Post post = (Post) o;
final Date created = new Date();
post.setCreated(created);
post.setLastModified(created);
}
}

@PreUpdate
public void preUpdate(Object o) {
log.info("call preUpdate");
if (o instanceof Post) {
Post post = (Post) o;
post.setLastModified(new Date());
}
}
}
In this example, a CDI managed bean Logger is injected into PostListener and is use for tracking the persisting and updating of the Postentity.
@EntityListeners(PostListener.class)
public class Post implements Serializable {...}
In the Post entity class, apply this EntityListener. When run this project on Glassfish 4, the related log will be displayed in the NetBeans Console view.
But unfortunately, when you try to add the same lifecycle callbacks in the @Entity class, the@Inject annotation does not work, neither in the new introduced @Converter.
The sample codes are hosted on my github.com account, check out and play it yourself.

JPA 2.1: Overview

$
0
0

JPA 2.1: Overview

JPA 2.1 brings a series of small improvements.
I have written some posts to introduce them one by one.
JPA 2.1 also includes some RDBMS improvements, such as supports Store Procedure, and adds function in JPQL. I am not a big fan of RDBMS, so these are not so attractive for me.
In this version, some features are still not perfect. As I motioned, the schema generation scripts strategy does not include a Hibernate equivalent UPDATE. Secondly, the CDI support is omitted in the @Converter and @Entity classes.
The JPA expert group should consider more about NoSQL support. Hear the voice from Hibernate community(there is a Hibernate OGM project for NoSQL, now supports Mongo, JBoss Infinispan) and other JPA providers, especially DataNucleus which has excellent NoSQL support.
The sample codes are hosted on my github.com account, check out and play it yourself.
Viewing all 90 articles
Browse latest View live